How Deep Should Corten Edging Be Buried?
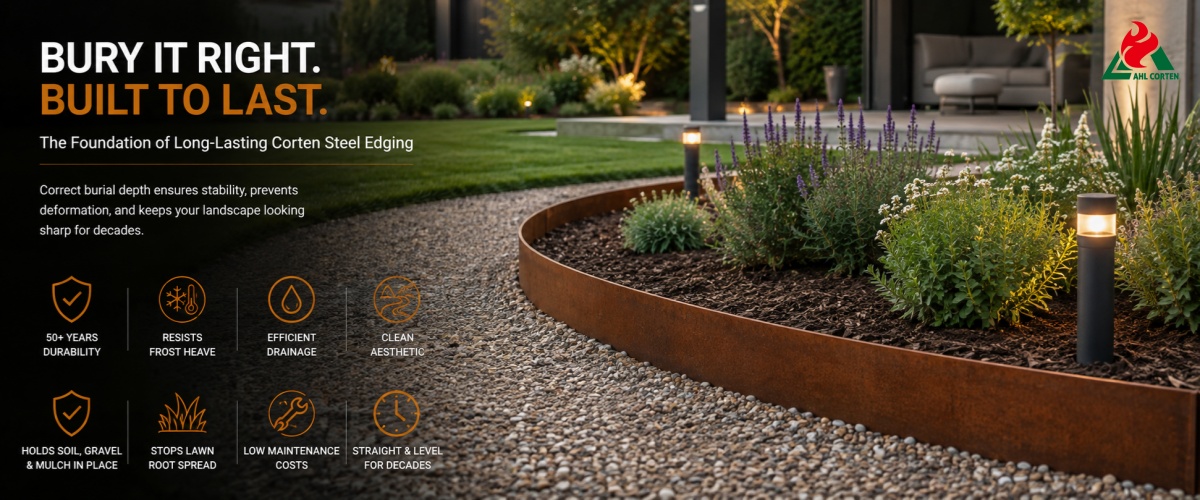
Weathered steel edging is the mainstream edging solution for modern gardens and landscaping projects. It creates a clean, crisp boundary between soft and hard landscaping elements, securely holds soil, gravel and mulch in place, whilst preventing the spread of lawn roots, combining aesthetic appeal with practicality.
Compared to edging made from plastic, timber or ordinary steel, the greatest advantage of weathering steel is its exceptionally long service life; high-quality products can remain in stable use for over 50 years.
However, numerous construction case studies confirm that over 70 per cent of issues with weathering steel edging—such as deformation, displacement and warping—are not due to product quality, but rather result from incorrect burial depth.
The depth of burial directly affects the structural stability of the edging, its resistance to frost heave, drainage efficiency and the final aesthetic outcome. By strictly adhering to the burial depth standards and ensuring proper installation from the outset, weathering steel edging can remain straight and level for decades, significantly reducing long-term maintenance costs.
The Golden Rule of Burial Depth: General Standards for Edging
1. Core Construction Formula
The industry’s universally accepted gold standard is that the depth buried underground should be between one-third and one-half of the total height of the edging panel; this serves as the benchmark for the vast majority of residential landscaping scenarios.
This burial depth ratio perfectly balances anchoring stability, resistance to lateral pressure and the exposed height above ground, ensuring that the edging will not become loose due to insufficient burial depth, nor will material be wasted or the decorative effect compromised due to excessive burial depth.
2. Reference Values for Measured Burial Depths of Common Specifications
For the two most commonly used weathering steel edging specifications in gardens, the precise burial depth parameters are as follows:
200 mm (8-inch) panels: 100 mm buried underground, 100 mm exposed above ground
150 mm (6-inch) panels: 50–75 mm buried underground, 75–100 mm exposed above ground
3. Depth Categories by Application
Depending on the intensity of use at the installation site, burial depths can be categorised into three levels to suit different application requirements:
- Shallow burial (≤40 mm): Suitable only for purely decorative, low-impact landscape borders where there is no foot traffic or pressure from lawns; highly prone to frost heave and slight tilting
- Medium burial (60–80 mm): The optimal standard depth for residential gardens, suitable for ordinary lawns and flowerbed borders, balancing stability and aesthetics
- Deep burial (80–120 mm): The standard for heavy-duty applications, suitable for slopes, driveways and high-traffic footpaths, offering exceptional resistance to compression and displacement
4. Two Key Risks Associated with Incorrect Installation Depth for Garden Edging
Improper installation depth for weathering steel edging directly compromises the overall finish; two common issues must be avoided at all costs:
- Insufficient depth: Unable to withstand pressure from lawn roots, impacts from lawnmowers and winter frost heave; highly prone to displacement,upturn and wavy deformation; lawn roots can easily penetrate the flowerbed from below
- Excessive burial depth: This results in a significant waste of material costs; the exposed decorative profile becomes too short, losing the unique layered texture of weathering steel, and makes subsequent maintenance and adjustments extremely difficult
4 Key Factors: The Basis For Precisely Adjusting The Burial Depth Of Garden Edging
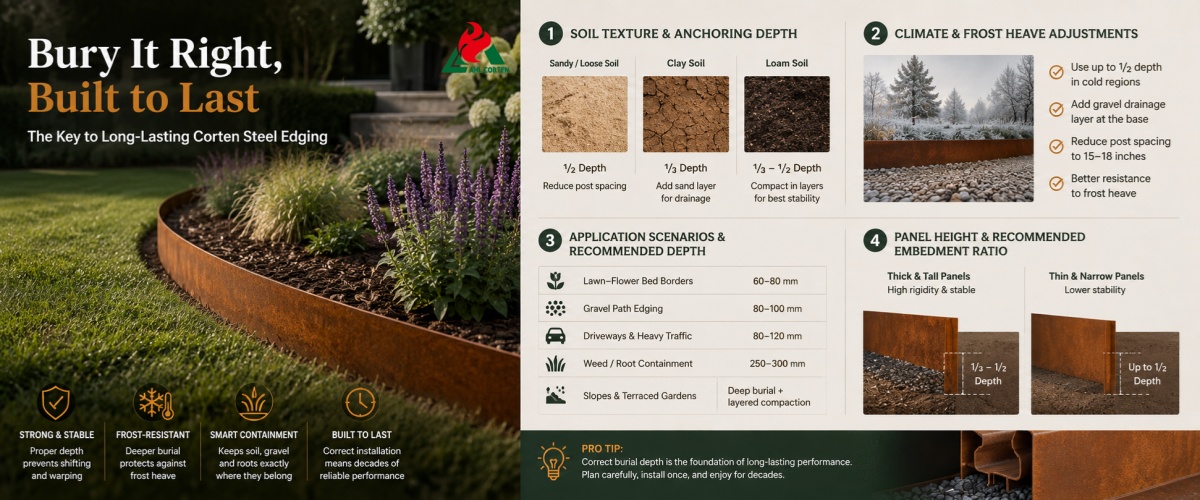
A burial depth of 1/3–1/2 is a general benchmark; however, actual installation requires fine-tuning based on site conditions to ensure long-term stability.
1. Soil Texture Affects Anchoring Depth
- Sandy/loose soil: With weak soil bearing capacity, a burial depth of 1/2 of the maximum standard is required, whilst the spacing between fixing posts must be reduced to prevent the edging from tilting due to soil loosening
- Clay: With compacted soil and good bearing capacity, a burial depth of 1/3 is sufficient to ensure stability; it is essential to lay a layer of sand for drainage to prevent waterlogging and corrosion of the steel base
- Loam (high-quality planting soil): The soil composition is balanced; the standard burial depth of one-third to one-half may be applied directly, with optimal stability achieved after compaction in layers.
2. Adjustments for Climate and Frost Heave Conditions
Northern regions with distinct seasons and freeze-thaw cycles are areas where edging displacement frequently occurs. Low temperatures can cause the soil to heave due to frost, making shallowly buried edging particularly susceptible to being pushed up and misaligned.
Construction standards for cold regions: Aim for a burial depth as close as possible to half the standard depth; lay a gravel drainage layer at the base; and reduce the spacing between fixing posts to 15–18 inches to enhance resistance to frost heave.
3. Edging Application Scenarios Determine Installation Requirements
- Lawn–flower bed boundaries: 60–80 mm burial depth, meeting everyday protection and aesthetic requirements
- Gravel path boundaries: Slightly deeper burial to withstand lateral pressure from gravel and prevent material spillage
- Driveways and heavy-traffic areas: A minimum burial depth of 80–120 mm is required to ensure structural stability under vehicle traffic and heavy impacts
- Weed/invasive grass containment zones: Increase the burial depth to 25–30 cm to completely block the lateral spread of grass roots
- Slopes and terraced gardens: Employ deep burial combined with layered compaction to resist rainwater erosion and soil slippage
4. Panel Dimensions and Recommended Embedment Depth Ratios
Thick and tall panels possess high rigidity and sufficient dead weight, and may therefore adhere to standard embedment depth ratios; thin and narrow panels, however, have relatively lower stability and should be embedded to approximately half the standard depth to enhance anchoring effectiveness and prevent deformation.
Standardized Construction Procedures for Weathering Steel Edging
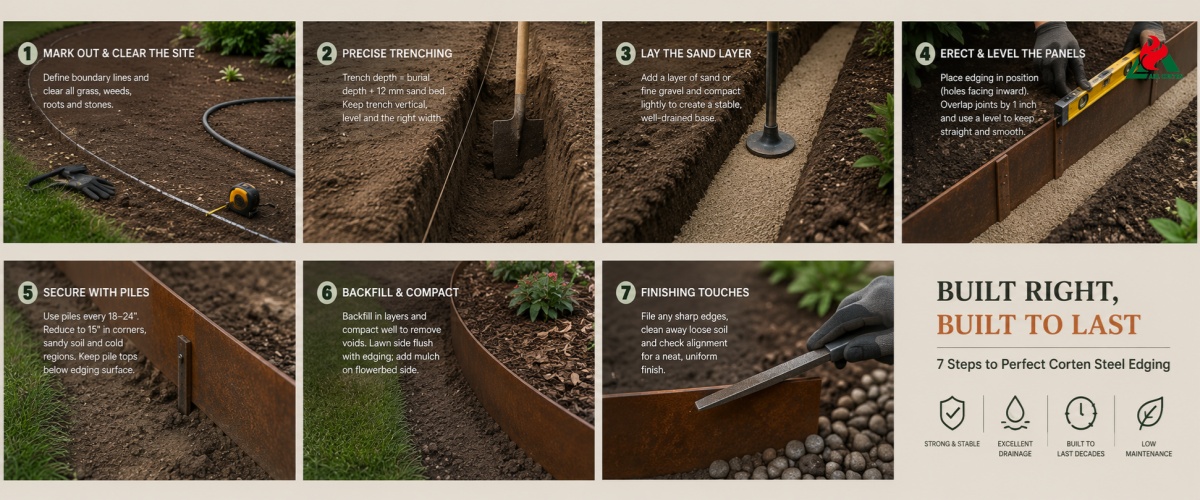
Step 1: Mark Out And Clear The Site; Determine The Boundary Lines
For straight sections, use a chalk line and tape measure to mark out the position; for curved sections, use a flexible hose to shape the line naturally, following the curvature specified in the landscape design. Thoroughly clear the construction area of weeds, grass roots and stones to prevent an uneven base, which could cause the edging to become misaligned during installation.
Step 2: Precise Trenching, Controlling Trench Depth
Trench depth = design burial depth + 12 mm sandy drainage bed. The trench must be kept vertical and level, with a width matching the slabs. V-shaped trenches must not be excavated, as this can easily lead to wave-like deformation.
Step 3: Laying the Sand Layer to Create a Drainage Base
Spread a layer of fine sand or fine gravel evenly across the bottom of the trench, then lightly compact and level it. This step is crucial for waterproofing and corrosion protection; it allows standing water to drain away quickly, preventing clay from becoming waterlogged and causing prolonged immersion of the steel, thereby preventing bottom corrosion and soil settlement.
Step 4: Erect And Level The Panels; Arrange Them Correctly
Place the corten metal edging into the trench, with the fixing holes facing the inner side of the flower bed to conceal the hardware and ensure a neat external appearance. Allow a 1-inch overlap at panel joints; for curved sections, bend the panels in stages to avoid deformation caused by sharp bends. Use a spirit level to calibrate throughout the process, and check the level by stretching a string line every few metres.
Step 5: Secure with Piles, Reinforce Key Points
Standard garden settings: pile spacing of 18–24 inches. In cold regions, on sandy ground, and at corner joints: reduce pile spacing to 15 inches, with additional reinforcement at points prone to displacement. The top of the piles must be below the surface of the panels to prevent damage to lawnmower blades.
Step 6: Backfill in Layers and Compact to Eliminate Voids
Backfill the soil on both sides in layers, compacting each layer thoroughly to completely eliminate internal voids. The soil on the lawn side should be level with the top surface of the panels, allowing the turf to slightly overlap the edges and conceal the joints; on the flowerbed side, apply mulch after compaction to create a clean, neat finish.
Step 7: Finishing Touches and Safe Completion
The cut steel edging must be smoothed with a file to eliminate any sharp edges and prevent scratches during subsequent maintenance. Finally, rinse away any loose soil and check the overall straightness of the lines to ensure a neat and uniform finish.
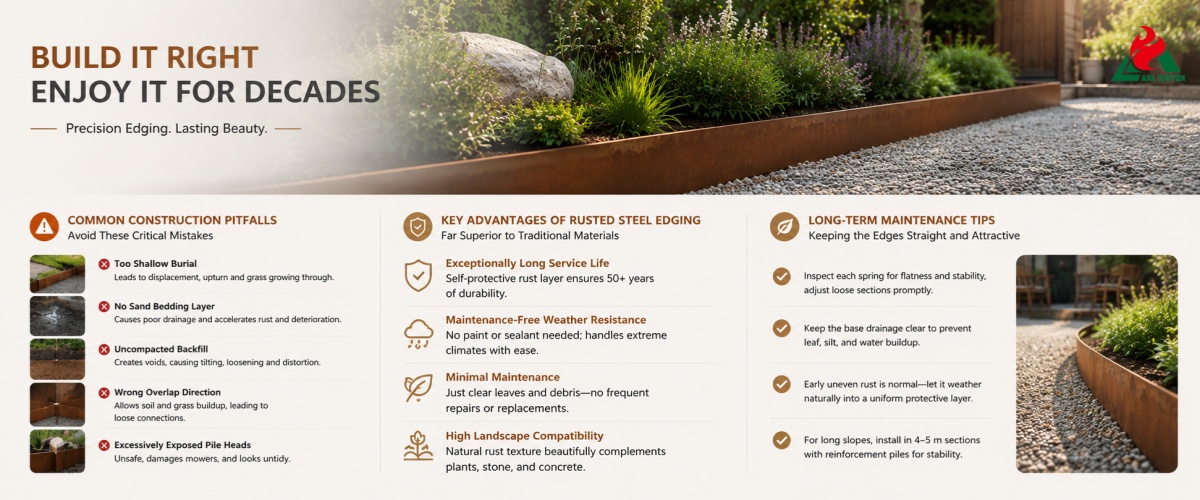
Common Construction Pitfalls: Avoid These Critical Mistakes
- Blindly burying the edging too shallowly: In pursuit of convenience, the edging is buried too shallowly; whilst this may look good in the short term, it will inevitably lead to displacement, upturn and grass growing through in the long run.
- Omitting the sand bedding layer: On clay soils, water cannot drain away, leaving the base of the steel edging constantly damp, which accelerates localised rusting and deterioration.
- Failure to compact backfill: Soil settlement creates voids, causing the edging to lose support and gradually tilt, loosen or become distorted.
- Incorrect overlapping direction: Joints overlapping in the wrong direction allow soil and grass to accumulate in the gaps, leading to loosening and failure at the connection points.
- Excessively exposed pile heads: This poses a safety hazard, risks damage to mowing equipment and compromises the overall neatness of the landscape.
Key Advantages of Rusted Steel Edging: Far Superior to Traditional Edging Materials
- Exceptionally Long Service Life: The naturally formed, dense rust layer provides self-protection, with a service life of over 50 years—far exceeding that of plastic or wooden edging
- Maintenance-Free Weather Resistance: No painting or sealing required; withstands extreme temperatures and rain erosion, suitable for all outdoor climates
- Minimal maintenance: Routine care involves merely clearing fallen leaves and debris; there are no costs associated with frequent repairs or replacements
- High landscape compatibility: The natural, vintage rust-coloured texture complements a wide range of garden features, including greenery, stone and concrete
Long-Term Maintenance Tips: Keeping the Edges Straight and Attractive
However, metal lawn edging requires no complex maintenance and can be kept in optimal condition for decades with simple care:
Each spring, once the ground has thawed, inspect the panels for flatness and stability, and make minor adjustments to any loose sections in a timely manner
Ensure the drainage at the base remains unobstructed to prevent the long-term accumulation of fallen leaves, silt and standing water
Uneven rust colouring in the early stages is normal and requires no intervention; a uniform protective layer will form naturally over time
For long slopes, install in short sections of 4–5 metres, using reinforcement piles to ensure smoother and more stable lines
DIY Installation vs Professional Installation: How to Choose Corten Steel Edging?
1. Scenarios Suitable for DIY Installation
Small gardens, level ground, simple straight or curved borders, standard flowerbeds with good soil quality, and lawn edging—these can all be completed to a professional standard with just basic tools.
2. Situations Where Professional Installation Is Recommended
Extremely long edging runs, sloping terraces, areas prone to severe frost heave, sites with loose soil, and custom-shaped designs. Professional installation ensures precise control over burial depth, levelling and reinforcement details, thereby avoiding costly rework.
Pre-Installation Checklist: Essential Checks Before Commencing Work
Precise burial depth is determined based on the height of the edging panels and site conditions
Have all the necessary tools to hand, including a tape measure, spirit level, rubber mallet, file and fixing stakes
The work area has been cleared of weeds, debris and grass roots, and the sub-base is level
Plans for the sand drainage layer, stake spacing and panel overlapping have been finalised
Are You Ready to Choose the Perfect Outdoor Corten Steel Edging for Your Space?
The final appearance of steel garden edging never depends on the panels themselves, but rather on precise burial depth, a properly prepared foundation and secure fixing techniques. By following the 1/3–1/2 ‘golden rule’ for burial depth, and fine-tuning it to suit your site’s soil, climate and surroundings, you can create straight, neat and long-lasting garden borders.
Would you like a bespoke burial depth plan, custom dimensions and professional installation guidance tailored to your garden? Contact us for a free consultation to receive one-on-one landscape edging design, on-site depth planning and an accurate quotation, ensuring your garden landscape remains as exquisite as the day it was laid for decades to come.
Back

 Fill In The Inquiry