Corten Steel Edging Installation: Professional Tips for Beginners
Date:2026.02.02
Share to:
Ever wonder why gardens designed by professionals always exude a clean, seamless aesthetic? The secret often lies in the details—corten metal edging.
With its crisp lines, fluid curves, and vintage rusted finish, it instantly elevates the entire landscape. Yet for beginners, installing weathered steel edging—especially curved designs—can seem daunting.
This guide thoroughly breaks down the core principles of installing weathering steel edging. From material advantages and tool preparation to step-by-step procedures, bending techniques, common pitfalls to avoid, creative applications, and brand recommendations—we'll guide you every step of the way to ensure a flawless first installation.
Decorative metal garden edging is the ideal choice for garden upgrades—durable, low-maintenance, and visually stunning. With professional techniques and premium materials from AHL Group, you can create a timeless, elegant boundary for your garden in just one afternoon.
Corten steel naturally oxidizes to form a stable protective rust layer. This rust acts like a “protective armor,” effectively resisting erosion from harsh outdoor conditions like rain, sun exposure, and frost, eliminating the need for frequent replacement or maintenance.
With a lifespan of 20-50+ years—and over 50 years for thicker grades—it far outperforms traditional edging materials like plastic or wood. A single installation delivers long-term value.
Its robust structure withstands lawn encroachment, weeding impacts, and daily garden wear, maintaining structural integrity even on uneven terrain.
2. Aesthetic Appeal Meets Practicality, Suitable for Diverse Garden Settings
Its vintage rust-toned finish deepens over time, seamlessly blending with natural elements like plants and stone. It complements modern, rustic, vintage, and vegetable garden styles.
Clean lines and sharp edges create visual depth, clearly defining functional zones like flower beds, pathways, and tree surrounds for a more organized garden layout.
As a physical barrier, it effectively prevents lawn encroachment into flower beds, significantly reducing weeding and maintenance time—freeing you to enjoy your garden more.
Suitable for vegetable gardens: The stable rust layer prevents harmful substances from leaching into the soil. Trace minerals like zinc and iron that naturally seep out benefit plant growth, ensuring complete safety.
No specialized skills or complex tools required. Core operations are straightforward and easy to understand, making it perfect for weekend DIY projects. The entire installation process can be completed in just one afternoon.
Features inherent flexibility, allowing easy bending into curved shapes with professional scoring techniques while also accommodating straight borders to suit diverse garden layouts.
Pre-drilled options are available for quick installation without additional drilling; supports both slotted and unslotted installation methods for flexible adaptation to your needs.
Measurement & Marking Tools: Tape measure, marker pen, chalk, wooden stakes. Used for precise boundary planning to prevent dimensional errors.
Digging Tools: Shovel or trenching tool. Used to excavate stable installation trenches (essential for slotted installation).
Fixing Tools: Rubber mallet for tapping edge trim and ground stakes into place without damaging steel surfaces.
Anchoring Tools: Weathering steel ground stakes/fixing nails offer superior holding power over screws for long-term stability.
Safety Gear: Non-slip gloves (prevent cuts from sharp steel edges), safety goggles (protect eyes during scoring or cutting).
Optional Tools: Angle grinder (with thin blade for scoring, bending, or trimming edging length; beginners should exercise caution).
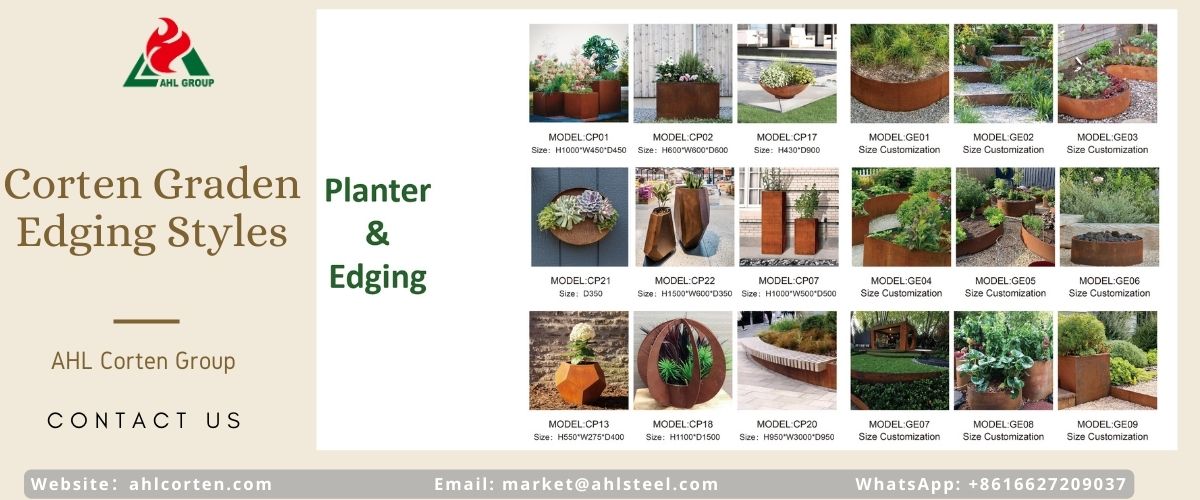
2. Recommended Materials for Beginners
Premium rusty metal edging: Select thickness based on garden conditions; prioritize thicker options for high-traffic areas to ensure durability.
Pre-drilled steel metal garden edging: Features pre-punched mounting holes, eliminating the need for additional drilling. Streamlines installation for beginners and prevents drilling errors.
Eco-friendly recycled plastic edging: An environmentally conscious alternative from AHL Group, ideal for sustainability-minded beginners. Balances practicality with aesthetic appeal.
Durable weather-resistant steel ground stakes/anchors: Must match the thickness of the metal garden lawn edging to ensure secure anchoring and prevent future shifting.
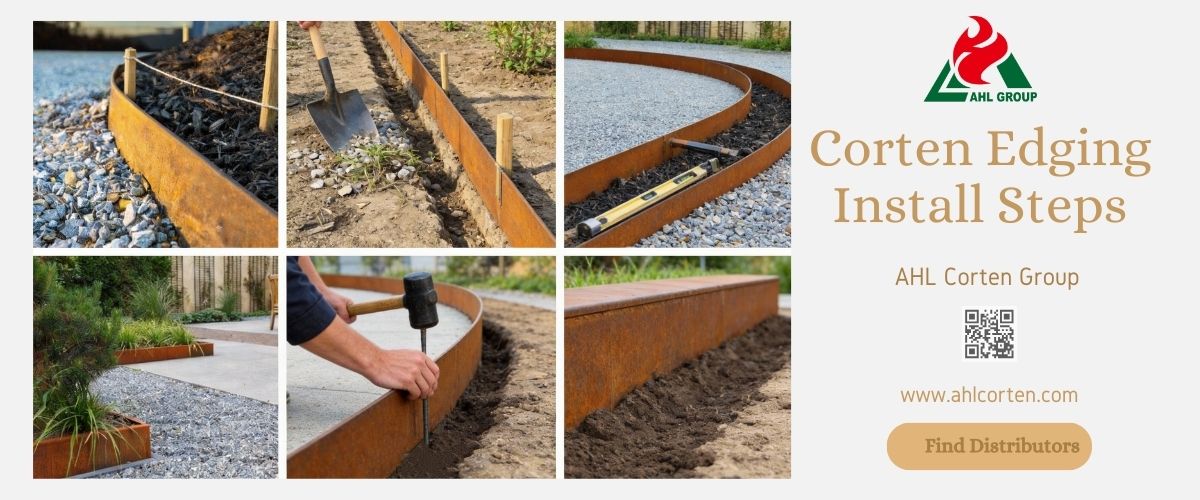
First, define the installation area—be it flower beds, pathways, tree surrounds, or vegetable garden borders. Use a tape measure to determine the total length and calculate the required amount of edge trim. We recommend measuring 1-2 extra times to avoid cutting errors caused by dimensional inaccuracies.
Use stakes and string (or chalk) to outline the installation boundary, clearly marking straight or curved paths to align with the garden's overall layout. Plan for uneven terrain in advance: If the installation area has slopes or elevation changes, mark the locations for stepped connections of the edging to avoid forcing a level installation, which can compromise aesthetics and drainage.
Step 2: Site Preparation and Trench Excavation (Optional but Recommended)
Clear debris such as gravel, weeds, and fallen leaves from the installation area. Remove surface turf to ensure edging can lie flat without obstructions.
Trench Installation (Recommended): Dig a shallow trench along the marked line, approximately half the height of the edging. This ensures stability and prevents future shifting or lifting.
Non-trench installation: Verify the installation area has loose soil to ensure stakes can penetrate smoothly. Also check the edging height to avoid excessive protrusion above ground level, which could create a tripping hazard.
Level the trench bottom (trench installation): Use a shovel to tamp and compact the trench bottom. Use the surrounding soil as a reference to ensure a uniform trench depth, allowing the corten steel path edging to remain level after installation.
Step 3: Positioning the Border Edging to Fit the Shape (Straight + Curved)
Place the corten border edging into the trench (or directly onto prepared soil), aligning it with the marked boundary line. Adjust the position to ensure it follows the path.
Straight Border Installation: Use a level (or visual inspection) to check if the border edging is level, ensuring the top is flush with the ground (slightly protruding to facilitate lawn mowing without compromising aesthetics).
Curved border installation: Employ professional notching techniques (see Section 6) to create natural curves. Never force bending to prevent cracking or deformation (detailed steps below).
Long strip border installation: Partner with an assistant—one person secures each end while the other guides the center section to align with the boundary, ensuring straight lines and smooth curves.
Step 4: Secure The Edging For Stability
Insert weathering steel ground stakes/fasteners through the pre-drilled holes (or self-marked holes) in the edging. Align vertically with the ground and tap gently with a rubber mallet. Apply even force to avoid damaging the steel or bending the stakes.
Check for stability: Gently shake the edging by hand to ensure no shifting or loosening occurs. Increase the number of stakes and reduce spacing in curved sections or uneven terrain to enhance fixation.
Avoid incorrect installation methods: Do not use too few stakes or over-tighten them. The former may cause future displacement, while the latter can induce stress cracks, shortening the service life of the weathering steel edging.
Step 5: Backfill Soil and Final Inspection
For trench-installed sections: Backfill soil into the trench, compacting it firmly against both sides of the edging to enhance stability and prevent movement.
Level surface soil: Smooth the soil around the installation area, ensuring the top of the Corten metal garden edging is clearly visible while maintaining flush alignment with the ground for future lawn maintenance.
Final Inspection: Clear debris from the installation site. Inspect the edging for unevenness, warping, or deformation, and make minor adjustments as needed. Enjoy your professionally crafted garden border!
Essential Tips for Beginners: Professional Techniques
Tip 1: Precision Scoring to Create Natural “Hinges”
On the back (non-visible side) of weathered steel edging, make shallow notches at even intervals. Avoid cutting too deeply to prevent weakening the steel's overall strength.
The core purpose of notching is to create controlled bending points—similar to punching holes in paper for folding. This allows the steel to bend naturally along the notches, forming smooth curves instead of stiff, forced angles.
Key points: Use an angle grinder with a thin saw blade. Wear safety goggles. Operate slowly and steadily. Beginners should practice on scrap material first before proceeding with the actual work.
Tip 2: Bend in Segments, Guide Naturally, Avoid Brute Force
Process only 1-2 feet (approx. 30-60 cm) at a time. Bending in small, segmented sections allows better curve control, preventing wavy or uneven lines and avoiding that “amateur look” common among beginners.
Never force bends: Excessive force causes stress cracks, distortion, and unnatural curves in the steel. This may lead to future fractures. Instead, gently guide the steel along its natural flexibility.
Large-Radius Bending Technique: Pre-bend sections lightly on flat ground beforehand. This allows the steel to adapt to the curve before on-site installation, reducing difficulty and enhancing smoothness.
Tip 3: Adapt to Terrain, Use Soil as a Reference
In sloped or uneven areas, employ stepped connections for curved edging instead of forcing a level line. This ensures smooth curves while preventing water pooling, balancing aesthetics and functionality.
Use the surrounding soil depth as a reference to ensure the top of the curved edging aligns flush with the ground. This clearly defines boundaries while allowing unimpeded lawn mowing and daily access.
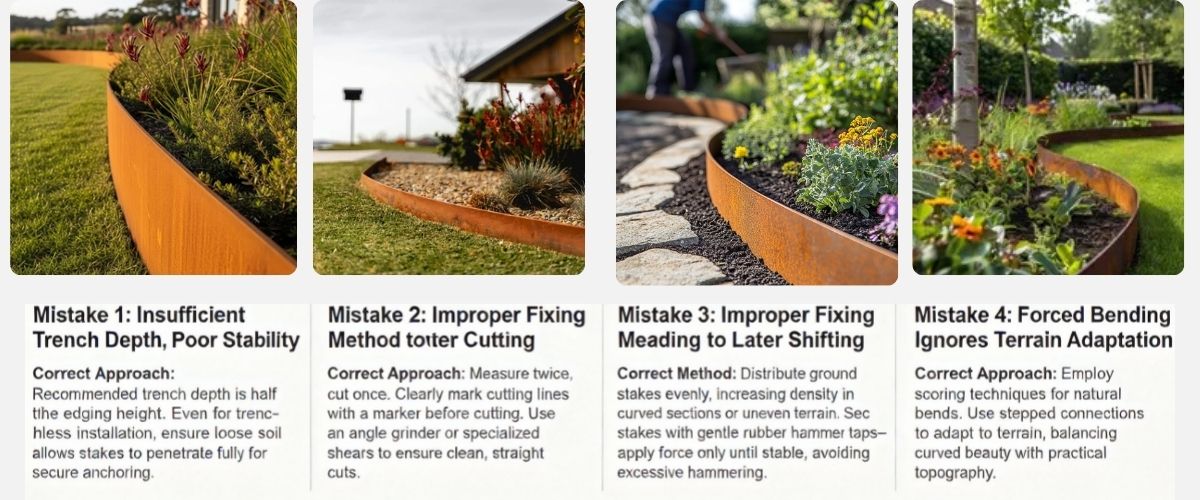
Shallow trenches cause edging to shift or lift after installation, especially after lawn mowing or rain erosion, compromising longevity and appearance. Correct Approach: Recommended trench depth is half the edging height. Even for trenchless installation, ensure loose soil allows stakes to penetrate fully for secure anchoring.
Mistake 2: Measurement Errors and Improper Cutting
Failing to measure accurately beforehand or relying on a single measurement often results in edging that is too short or too long, wasting material. Cutting without clearly marking the line leads to crooked cuts and dimensional inaccuracies. Correct Approach: Measure twice, cut once. Clearly mark cutting lines with a marker before cutting. Use an angle grinder or specialized shears to ensure clean, straight cuts.
Mistake 3: Improper Fixing Methods Leading to Later Shifting
Insufficient ground stakes, excessive spacing between stakes, or over-hammering stakes causing deformation can all result in unstable edging. This may lead to shifting or wobbling over time.
Correct Method: Distribute ground stakes evenly, increasing density in curved sections or uneven terrain. Secure stakes with gentle rubber hammer taps—apply force only until stable, avoiding excessive hammering.
Forcing steel to bend without scoring creates stress cracks, resulting in unnatural, rigid curves that compromise aesthetics and durability. Insisting on horizontal installation over uneven terrain disrupts smooth curves and may cause water pooling.
Correct Approach: Employ scoring techniques for natural bends. Use stepped connections to adapt to terrain, balancing curved beauty with practical topography.
Defining Functional Zones: Use metal landscape edging to clearly delineate borders for flower beds, pathways, vegetable gardens, and leisure areas, creating a more structured garden layout and enhancing overall aesthetic appeal.
Create Landscape Focal Points: Install circular edging around trees or create borders for raised gardens to highlight key landscape elements and add depth to the garden's visual layers.
Coordinated Design Integration: Pair with AHL Group's steel planters and metal landscape ornaments to create a unified garden aesthetic, elevating the overall design coherence.
Softening Rigid Lines: Employ curved weathering steel edging to soften the harshness of straight pathways and flowerbeds, fostering a natural, flowing visual experience.
Why Choose AHL Group's Weathering Steel Edging?
Quality and Reputation Guaranteed: Trusted by homeowners and landscape designers alike, our products deliver consistent quality and reliable performance, resisting deformation and cracking over time.
Beginner-Friendly Design: Most products feature pre-drilled holes and specialized ground stakes, simplifying installation for easy DIY setup without professional skills.
Versatile Product Range: Offers both thick and thin weathering steel edging, plus eco-friendly recycled plastic alternatives, accommodating diverse garden settings and styles.
Professional Support: AHL Group provides garden design consultation and installation guidance, with one-on-one assistance for beginners to ensure flawless project execution.
FAQ: Corten Steel Edging Installation (Essential for Beginners)
Q1: What Is The Lifespan Of Weathering Steel Edging?
A1: Lifespan depends on steel thickness and environment. Thick weathering steel lasts over 50 years, while thin options last around 20 years—far exceeding traditional materials like plastic or wood.
Q2: Will Rusted Steel Edging Stain Surrounding Surfaces or Plants?
A2: During the initial rust layer formation, minor staining of nearby surfaces may occur. Once the rust layer stabilizes (typically 1-3 months), staining ceases and poses no harm to plant growth.
Q3: Is Corten Steel Edging Suitable for Vegetable Gardens?
A3: Yes. The stable rust layer formed on weathering steel does not leach harmful substances into the soil. Trace minerals like zinc and iron that may seep out are beneficial micronutrients for plant growth and promote vegetable health.
Q4: Can Weathering Steel Edging Be Installed Without Trenching?
A4: Yes. However, ensure the installation area has loose soil to allow ground stakes to penetrate fully for secure anchoring. Also, control the edging height to prevent tripping hazards from excessive protrusion above ground level. Trenching provides superior stability and is recommended for beginners.
Q5: Do Beginners Need An Angle Grinder For Installation?
A5: No. Basic installation requires only simple tools like a shovel, rubber mallet, and tape measure. Angle grinders are used for scoring, bending shapes, or cutting lengths. Beginners may choose based on their needs; if using one, practice the operation first.
Q6: How Do I Fix Uneven Curves or Wavy Edges After Installation?
A6: Gently pull out the ground stakes. Add evenly spaced notches on the back of the uneven section. Slowly guide the edge trim into a smooth curve. Press it into place by hand before reinserting the stakes. Make minor adjustments in sections to prevent overall displacement.
Ready to Choose Your Exclusive Outdoor Corten Steel Edging?
AHL Group's corten steel edging (including pre-drilled and eco-friendly options) is designed for beginners. Paired with professional after-sales support, it significantly reduces installation difficulty and ensures long-term performance. Select AHL Group's premium metal landscaping edging (pre-drilled, beginner-friendly) for bulk purchase discounts—making garden renovations more cost-effective.
Contact us now for a complimentary catalog and quote on Corten steel edging. This weekend, transform your garden with weathering steel edging and effortlessly achieve professional-grade, refined borders!

.jpg)
.jpg)
.jpg)