How Do You Join Corten Steel Edgings?
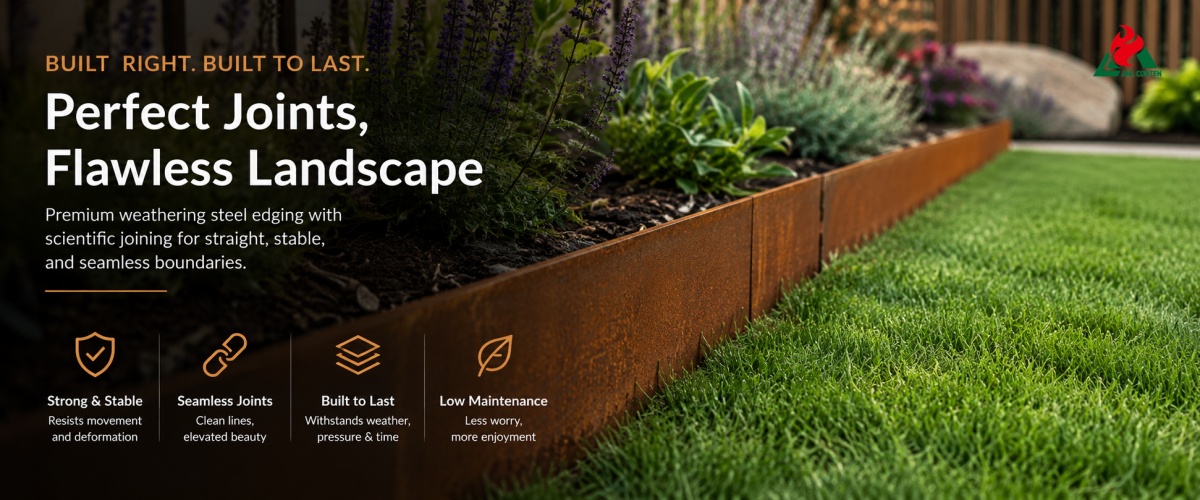
With its distinctive vintage reddish-brown rust color and clean, crisp lines, weathering steel edging has become a mainstream premium material for modern gardens, villa landscapes, and municipal landscaping. It clearly delineates the boundaries between lawns, flower beds, gravel, and paved areas, significantly enhancing the overall refinement and sophistication of the garden.
However, many homeowners and construction teams face the same challenge: shortly after installation, the metal garden bed edgings develop issues such as misaligned joints, loosening and shifting, and warped or distorted lines. This not only disrupts the landscape’s cohesiveness but also leads to problems like weeds sprouting through the gaps and soil spilling out.
The root cause of most rusted steel edging damage, deformation, and failure is not the material itself, but improper installation methods. Many overlook the physical properties of steel—specifically thermal expansion and contraction—as well as external forces caused by soil heaving and lateral pressure.
A scientific joining process combined with a stable connection system ensures that garden bed border edging remains straight, neat, and seamless, while withstanding decades of outdoor environmental erosion and significantly extending its service life.
With over 20 years of expertise in high-end corten steel landscape manufacturing, AHL will combine industrial-grade construction standards to provide a detailed breakdown of four mainstream joining methods, standardized installation steps, and key details to avoid pitfalls, helping you solve weathering steel edging joining challenges once and for all.
4 Main Methods for Joining Weathering Steel Edgings
Different garden layouts, site topography, project budgets, and aesthetic requirements call for completely different joining methods. The following four are recognized as classic techniques in landscape engineering, covering all scenarios from home DIY projects to commercial landscaping and high-end custom designs.
1. Pre-drilled, Screw-Jointed Method (Top Choice for Home DIY)
This is currently the most widely used and easiest-to-implement joining method for home garden renovations and villa courtyard upgrades worldwide, making it perfectly suited for self-installation by non-professional homeowners.
- Technical Principle: Using CNC precision machinery, the factory pre-machines interlocking stepped grooves and precise alignment holes at both ends of the edging strips. This eliminates the need for on-site drilling or cutting, allowing for direct alignment and secure interlocking.
- Installation Method: Align two edging strips along the interlocking grooves and secure them using specialized weather-resistant steel screws or 304 stainless steel corrosion-resistant screws.
- Key Advantages: Fast installation and minimal tool requirements—only a standard household electric screwdriver is needed. The joint surface is flat with no protrusions, featuring minimal gaps for a clean, minimalist appearance with no rough seams.
- Applications: Home garden upgrades, villa terrace landscaping, straight or curved borders in small courtyards, and personal DIY landscaping projects.
2. Invisible Backplate Connectors (for Long-Distance Straight Landscape Edging)
Designed for large-scale landscaping and extra-long straight boundaries, this industrial-grade core process ensures that edging lines remain “perfectly straight and never warped,” serving as the “rigid framework” for long-distance edging.
- Technical Principle: Instead of relying on the corten steel edgings to overlap and secure themselves, thick, high-rigidity, corten steel backing plates are installed on the back of the joint between two garden bed border edgings to reinforce and lock them in place from the rear.
- Core Advantages: Virtually zero visible seams on the front, with the connection structure completely concealed, presenting a seamless, integrated visual effect. The backing plate evenly distributes lateral soil pressure and thermal expansion/contraction stresses, completely eliminating issues such as seam misalignment and serpentine distortion.
- Applications: Large-scale park landscapes, ultra-long pathway borders, commercial green belts, and straight-line edging for large, flat lawns.
3. Ground Anchor Spike Reinforced Jointing (For Undulating Terrain and Lawns)
Edge jointing must not only connect two sections of panels but also lock the entire structure in place, anchor it into the soil, and resist terrain shifts and external compaction. This technique perfectly addresses both jointing and anchoring requirements.
- Technical Principle: At the overlapping seam of the corten steel edgings, extended heavy-duty spike anchors are driven through the joint and deep into the hard subsoil, achieving integrated locking of the seam and underground anchoring.
- Key Advantages: The anchors penetrate 20–30 cm into the soil, firmly rooting themselves like expansion bolts. This design effectively resists lateral shear forces caused by soil expansion due to water absorption and frost heave, while withstanding the high-frequency impact of lawn mowers.
- Applications: Flower beds on gently sloping terrain, high-traffic garden bed border edgings, uneven courtyard areas, and regions with moist, loose soil.
4. On-Site Industrial Welding (Top-tier option for high-end, seamless luxury projects)
For high-end landscapes that pursue ultimate minimalism with absolutely no visible seams, welding is the only top-tier technique capable of achieving a fully integrated, seamless effect. It is commonly used in high-end custom artistic landscapes.
- Process Principle: Professional welders use weather-resistant steel-specific copper-rich electrodes to perform full-groove, full-penetration welding on the edge strip joints. After welding, the surface is ground and polished to micron-level smoothness, eliminating slag and protrusions.
- Core Advantages: Completely eliminates physical gaps and protruding screws, with structural strength equivalent to a single, solid steel plate. Over time, exposure to wind and rain will naturally cause the welds to develop a chocolate-brown patina matching the base material, ensuring complete uniformity in color and texture for a truly premium aesthetic.
- Applications: High-end custom villas, landscape display areas, complex artistic curves, dry landscape (karesansui) designs, 90° right-angle corners, and other sophisticated, high-end projects.

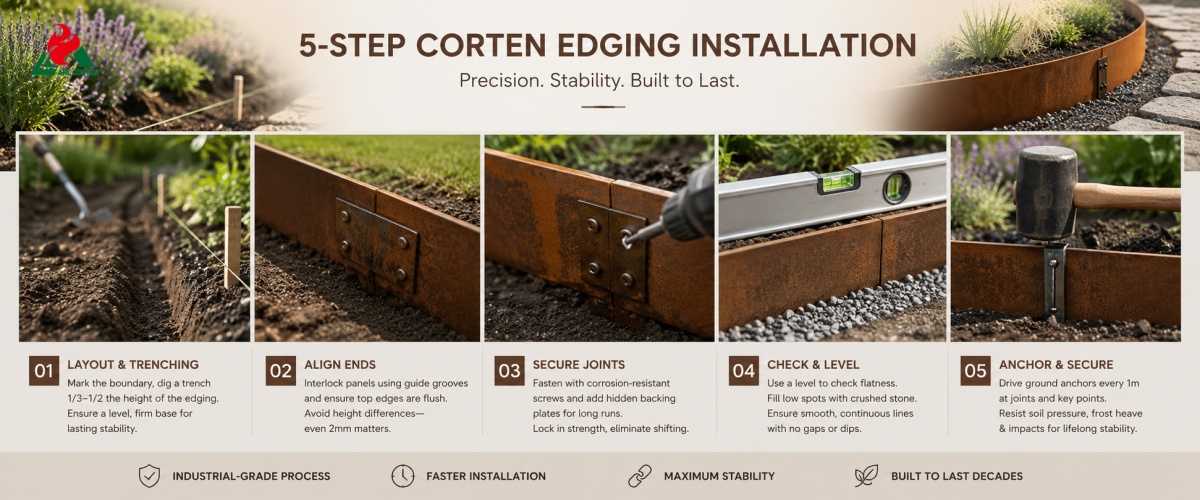
5-Step Industrial-Grade Corten Edging Installation Process
A standardized installation process is the key to ensuring that landscape metal edgings remain distortion-free and secure for decades. By following AHL’s standardized five-step installation method, you can cut construction time in half while ensuring lifelong stability and durability.
Step 1: Precise Layout and Trenching—Laying the Foundation
Before construction, use nylon string or garden chalk to precisely mark out straight or curved boundary lines. Dig a narrow trench along the marked lines, to a depth of 1/3 to 1/2 the height of the edging strip.
Thoroughly clear the trench of debris, sharp objects, and plant roots to ensure the trench bottom is level and firm, preventing uneven stress distribution, localized sinking, or misalignment of the edging strips later on.
Step 2: Align Ends to Eliminate Height Discrepancies
Place the first section of the rusted steel edging vertically into the trench, then connect the second section. Use the built-in guide grooves on the panels to interlock them, strictly ensuring that the top edges are flush.
High-low misalignment and end-to-end displacement are strictly prohibited; even a 2mm height difference will be amplified by lawnmower impact later on, damaging the overall line.
Step 3: Secure the Joint Structure for a Seamless Finish
Once the panels are properly aligned, secure them vertically using the provided corrosion-resistant screws. For large-scale, long-distance installations, install hidden backing plates simultaneously to lock the joints in both directions.
By reinforcing with screws and backing plates, the two separate panels are fused into a single rigid structure, eliminating joint loosening or shifting at the source.
Step 4: Fine-Tune Horizontal Alignment to Eliminate Minor Gaps
Use a level to check the flatness of the joint positions, identifying any minor unevenness or gaps. If the soil at the bottom of the trench is loose and causes localized subsidence, lay a small amount of crushed stone to level the surface.
After fine-tuning, ensure the overall lines are smooth and continuous, with no depressions, no protrusions, and no visible joints.
Step 5: Deep-Set Ground Anchors for Reinforcement, Securing Overall Stability
At all joint junctions and load-bearing points spaced 1 meter apart, use a rubber mallet to drive heavy-duty ground anchors vertically or at a 15° angle into deep, hard soil.
Once the ground anchors are fully embedded and interlocked, they firmly secure the entire structure, resisting lateral soil pressure, frost heave, and external impacts to ensure long-term stability and prevent deformation.
4 Core Construction Guidelines for Corten Steel Edging
Most edgings for landscaping develop issues such as warping, cracking, rusting, and misalignment after 1–2 years of use. This is not due to manufacturing defects, but rather the neglect of microscopic construction details. The following four guidelines must be strictly adhered to.
Guideline 1: Ensure Seams Are Flush; Eliminate Uneven Levels
When joining panels, the top garden bed border edgings must remain continuous, with straight lines perfectly level and curved edges smooth. Avoid forceful hammering that causes end deformation or uneven alignment.
Even minor height differences can become impact points for lawnmower blades. Prolonged, frequent impacts will cause panel deformation and joint cracking, completely ruining the landscape lines.
Guideline 2: Allow for Expansion Gaps to Account for Thermal Expansion and Contraction
Weathering steel adheres to the physical laws of thermal expansion and contraction; exposure to high summer temperatures causes linear expansion. For long-distance installations, a 1–2 mm expansion gap must be left.
During winter construction in low temperatures, it is strictly prohibited to seal all gaps or forcefully lock the joints. Otherwise, expansion stresses cannot be released in summer, leading to widespread bulging, waviness, and distortion.
Guideline 3: Double Reinforcement for Soft and Wet Sites to Enhance Foundation Bearing Capacity
In rainy and humid regions, or on soft soil types such as clay and sandy soil, water exposure generates extremely strong lateral thrust, which can easily cause joint displacement and panel tilting.
In such sites, dual ground anchors must be installed on both sides of the joints. Additionally, backfill the area around the anchor points with crushed stone to improve drainage and increase foundation rigidity, thereby preventing soft soil settlement from eroding the structure.
Guideline 4: Matching Material of Fittings to Prevent Electrochemical Corrosion
This is the most critical hidden hazard. The use of ordinary galvanized screws, carbon steel fittings, or aluminum connectors is strictly prohibited for panel joints.
Potential differences between dissimilar metals can trigger galvanic reactions, leading to electrochemical corrosion. Ordinary fittings will corrode and break within 1–2 years, directly causing joint failure and edge trim failure.
All fittings must be paired with original manufacturer’s weathering steel fittings or 304/316 stainless steel fasteners. Using materials of the same origin eliminates the risk of corrosion.

Frequently Asked Questions (FAQ): Corten Steel Edging
Q1: Does the Installation of Corten Steel Edging Require Welding?
No. In 95% of residential and villa courtyard projects, a perfect finish can be achieved using prefabricated plug-in joints and hidden backing plates. Welding is only suitable for high-end seamless artistic landscapes; for standard applications, mechanical locking is entirely sufficient and offers better value for money.
Q2: Can Ordinary Homeowners Install the Edging Themselves?
Absolutely. AHL’s modular edging features a simple, Lego-style assembly design. With just three tools—a marking tool, an electric screwdriver, and a rubber mallet—anyone can complete the installation of a full garden edging set in just 3 hours, without any professional construction experience.
Q3: Will the Joints Be Noticeable and Affect the Appearance?
When installed properly, the gaps are virtually imperceptible. Initially, there are only slight construction seams, but after 3–6 months of natural weathering, the surface rust layer will naturally blend and cover the joints, ultimately presenting a seamless, high-end, integrated look.
Q4: Is It Necessary to Apply Anti-Rust Paint for Protection After Installation?
It is completely unnecessary, and we do not recommend it. The core advantage of weathering steel is that it naturally forms a self-healing protective layer through cycles of wet and dry exposure. Sealing coatings block air and moisture, disrupting the oxidation process and causing internal rot and uneven coloration.
Q5: Will the Joining Screws and Accessories Rust and Break First?
No. AHL’s matching accessories are made of the same weathering steel or high-grade stainless steel. Their metal potential perfectly matches that of the base material, eliminating electrochemical corrosion at the source. The lifespan of the accessories is on par with that of the edging strips themselves.
Are You Ready to Choose Your Own Corten Steel Edging?
The key to the aesthetic appeal and longevity of weathering steel edging lies not in the material itself, but in professional installation techniques.
Issues such as misalignment, deformation, soil intrusion, and weed growth caused by haphazard installation can be completely avoided through standardized construction. Each of the four installation methods is suited to specific scenarios; by selecting the appropriate method and following proper installation procedures, you can achieve a balance of aesthetics, stability, and cost-effectiveness.
Choose the AHL industrial-grade corten steel edging jointing system. With rigorous heavy-duty craftsmanship, we create garden borders that remain distortion-free for decades, require zero maintenance, and boast a high-end aesthetic—ensuring your landscape lines become increasingly refined and sophisticated over time. Contact us today to receive a free catalog and quote for Corten steel edging!
Back