8 Steps for Cutting and Installing Corten Steel Fences
In modern landscape design, corten steel screen fences have become a premium choice for creating spatial divisions and enhancing the aesthetic appeal of a site, thanks to their clean, industrial lines and the warm, reddish-brown texture of their rusted surface.
Unlike ordinary wrought iron fences, corten steel naturally forms a unique oxide protective layer, offering superior corrosion resistance. Combining both decorative and practical functions, it is widely used in various projects such as courtyard landscaping, commercial complexes, and municipal landscapes.
Many landscape construction teams and gardening enthusiasts, upon first encountering weathered steel panels, often mistake them for ordinary rusted sheet metal. During construction, they frequently encounter various challenging issues that severely impact project progress:
Steel’s high density and hardness cause rapid wear on standard cutting blades, resulting in crooked and uneven cuts;
Cut edges are covered with burrs and slag, leading to poor joint alignment and compromised straightness of the fence;
Incorrect cutting damages the base material, leading to abnormal corrosion and peeling at the cut edges later on, resulting in project rejection.
The root cause of these issues lies in the special alloy composition of weathering steel, which offers significantly higher cutting resistance than ordinary carbon steel. Haphazard construction methods are not only inefficient but also cause fence deformation and irregular rust spots, ultimately resulting in high rework costs.
Weathering steel is not difficult to process; it can be easily installed as long as standardized procedures are followed. Drawing on AHL Group’s 20 years of experience in weathering steel manufacturing and global exports, this article breaks down an 8-step standardized cutting and installation process.
.jpg)
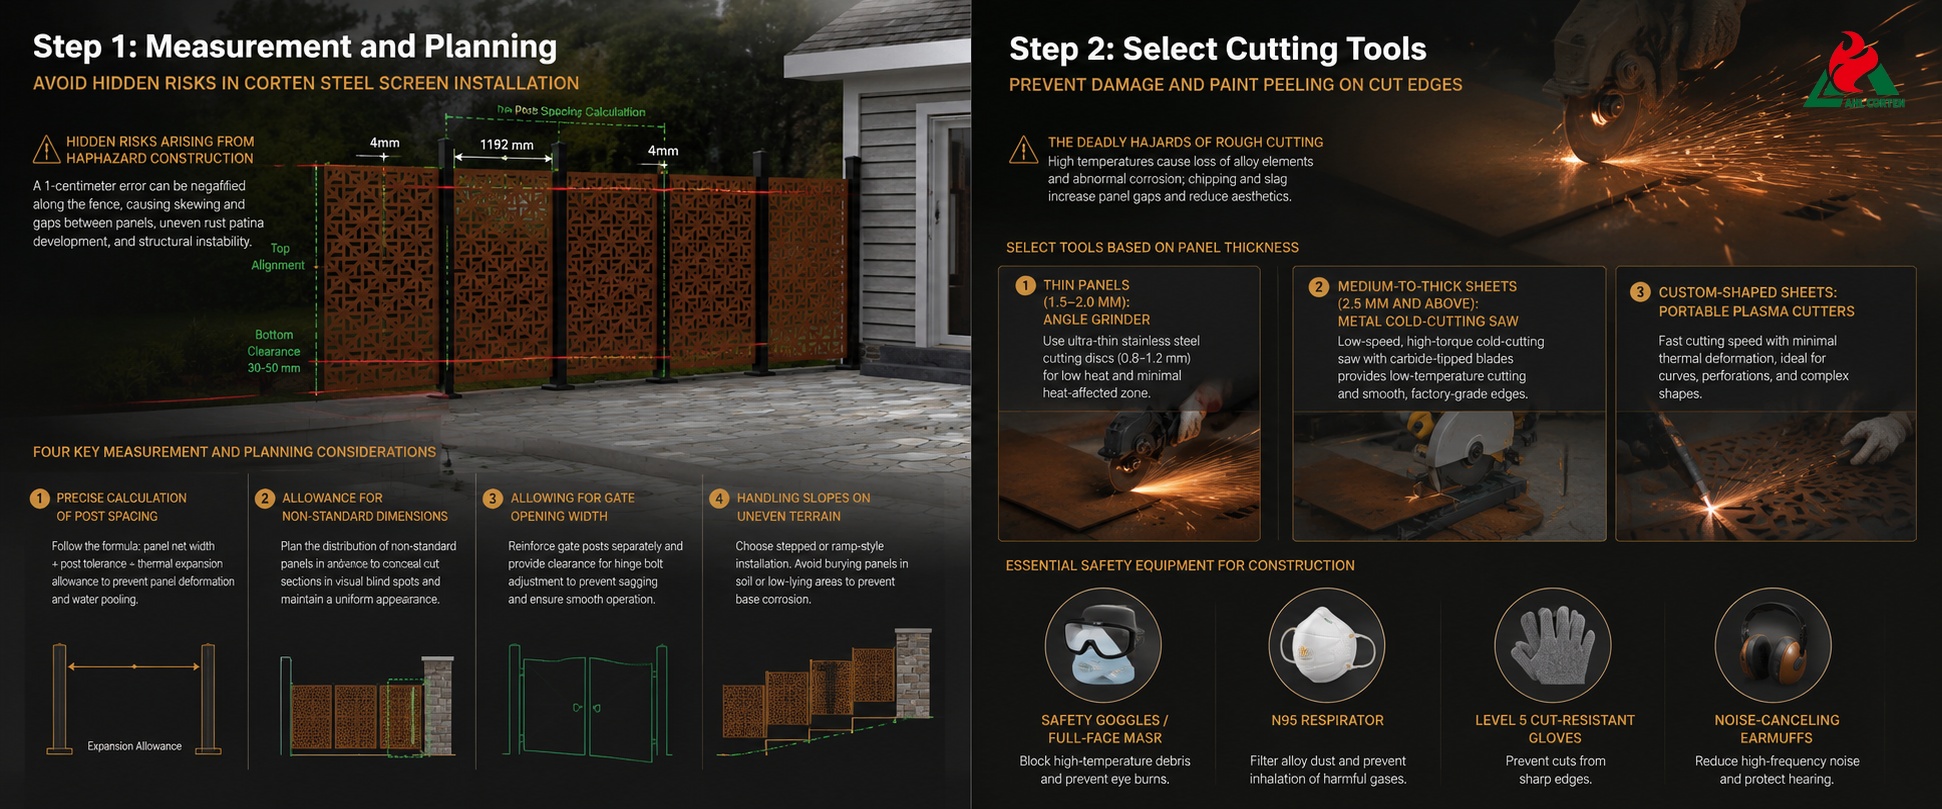
Step 1: Measurement and Planning to Avoid Hidden Risks in Corten Steel Screen Installation
Hidden Risks Arising from Haphazard Construction
Many construction teams proceed directly to cutting and installation upon receiving the weathering steel fences, neglecting preliminary measurement and planning. Weathering steel is highly sensitive to visual alignment; a 1-centimeter error can be magnified to several meters along the fence, resulting in noticeable skewing and gaps between panels.
Additionally, improper layout can lead to uneven rust patina development over time, compromising the overall aesthetic appeal and creating structural instability risks.
4 Key Measurement and Planning Considerations
① Precise Calculation of Post Spacing
Strictly follow the formula: weathered steel panel net width + post tolerance + thermal expansion allowance. Weathering steel exhibits significant thermal expansion and contraction, with substantial deformation under extreme temperature fluctuations.
If post spacing is set too tightly, the panels will deform under thermal pressure, causing water to pool in the depressions and form unsightly black rust spots.
② Allowance for Non-Standard Dimensions
Fence corners and junctions with building walls are high-frequency locations for on-site cutting. Before construction, plan the distribution of non-standard panels in advance to conceal cut sections in visual blind spots as much as possible.
Avoid splicing narrow panels at prominent locations such as main gates to ensure the fence maintains a uniform and symmetrical appearance.
③ Allowing for Gate Opening Width
If the corten steel screen fence includes pedestrian or vehicular gates, the gate posts must be reinforced separately, and clearance must be provided for hinge bolt adjustment. This prevents weathering steel gate panels from sagging under their own weight, which can cause lock jamming or improper closure.
④ Handling Slopes on Uneven Terrain
Outdoor ground surfaces are rarely completely level. When encountering slopes, select either a stepped or ramp-style installation method in advance. Do not bury panels directly in soil or low-lying, waterlogged areas to prevent pitting corrosion caused by oxygen deprivation at the base, which would prevent the formation of a healthy rust-preventive layer.
Step 2: Select Cutting Tools to Prevent Damage and Paint Peeling on Corten Steel Screen Cut Edges
The Deadly Hazards of Rough Cutting
Some construction workers mistakenly believe that weathering steel screen will rust on its own and carelessly use old saw blades or ordinary cutting discs during construction. This rough cutting leads to two major issues:
High temperatures cause the steel at the cut edges to anneal and lose alloy elements, resulting in blackening, peeling, and abnormal corrosion later on; the cuts produce significant chipping and slag, and the gaps between panels become too large, significantly reducing aesthetic appeal.
Select Tools Based On Panel Thickness
① Thin Panels (1.5–2.0 Mm): Angle Grinder
This is the most common on-site processing method and must be paired with specialized ultra-thin stainless steel cutting discs (0.8–1.2 mm). These discs offer low cutting resistance and minimal heat generation, reducing the heat-affected zone and effectively preventing chipping.
② Medium-To-Thick Sheets (2.5 Mm And Above): Metal Cold-Cutting Saw
Angle grinders are unsuitable for cutting thick columns and load-bearing sheets, as they result in high consumable wear and require significant effort. We recommend using a low-speed, high-torque cold-cutting saw with carbide-tipped blades for low-temperature cutting, producing smooth edges comparable to factory-grade precision.
③ Custom-Shaped Sheets: Portable Plasma Cutters
For curved shapes, perforated designs, and large-scale non-standard cutting projects, plasma cutters are the preferred choice. They offer fast cutting speeds and minimal thermal deformation, making them suitable for processing all types of complex shapes.
Essential Safety Equipment for Construction Sites
Steel cutting generates high-temperature sparks and alloy dust, so industrial-grade protective gear must be provided to ensure worker safety:
- Safety goggles/full-face mask: Block high-temperature metal debris and prevent eye burns;
- N95 respirator: Filter out copper- and chromium-containing alloy dust and prevent inhalation of harmful gases;
- Level 5 cut-resistant gloves: Prevent cuts from sharp edges;
- Noise-canceling earmuffs: Reduce high-frequency noise from metal cutting and protect hearing.
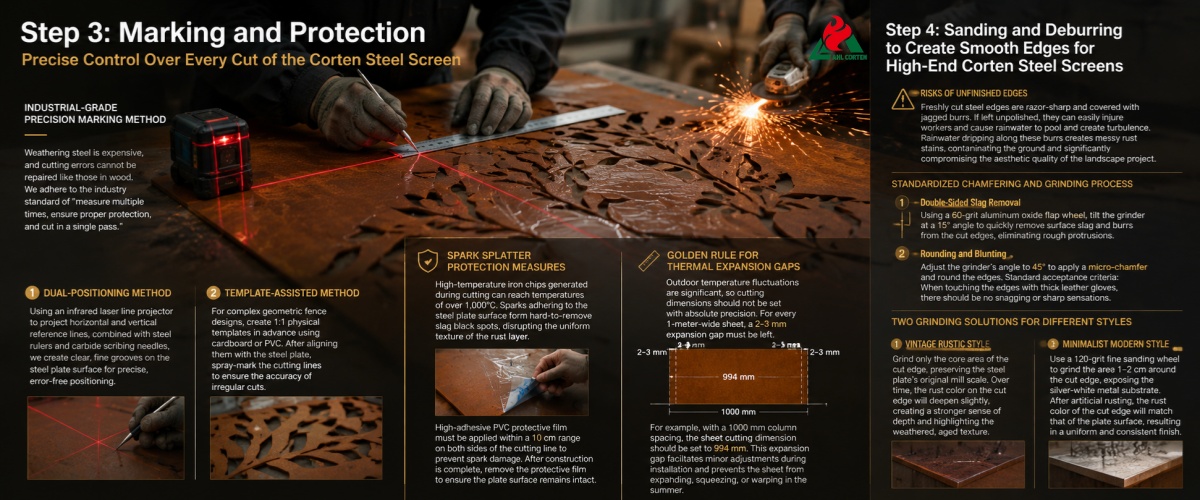
Step 3: Marking and Protection: Precise Control Over Every Cut of the Corten Steel Screen
Industrial-Grade Precision Marking Method
Weathering steel is expensive, and cutting errors cannot be repaired like those in wood. Therefore, we adhere to the industry standard of “measure multiple times, ensure proper protection, and cut in a single pass.” The use of ballpoint pens or thick markers for marking is strictly prohibited to avoid visual errors at the millimeter level.
① Dual-Positioning Method
Using an infrared laser line projector to project horizontal and vertical reference lines, combined with steel rulers and carbide scribing needles, we create clear, fine grooves on the laser cut corten steel panels surface for precise, error-free positioning.
② Template-Assisted Method
For complex geometric fence designs, create 1:1 physical templates in advance using cardboard or PVC. After aligning them with the steel plate, spray-mark the cutting lines to ensure the accuracy of irregular cuts.
Spark Splatter Protection Measures
High-temperature iron chips generated during cutting can reach temperatures of over 1,000 degrees Celsius. Sparks adhering to the steel plate surface form hard-to-remove slag black spots, disrupting the uniform texture of the rust layer.
High-adhesive PVC protective film must be applied within a 10 cm range on both sides of the cutting line to prevent spark damage. After construction is complete, remove the protective film to ensure the plate surface remains intact.
Golden Rule for Thermal Expansion Gaps
Outdoor temperature fluctuations are significant, so cutting dimensions should not be set with absolute precision. For every 1-meter-wide sheet, a 2–3 mm expansion gap must be left.
For example, with a 1000 mm column spacing, the sheet cutting dimension should be set to 994 mm. This expansion gap facilitates minor adjustments during installation and prevents the sheet from expanding, squeezing, or warping in the summer.
Step 4: Sanding and Deburring to Create Smooth Edges for High-End Corten Steel Screens
Risks of Unfinished Edges
Freshly cut corten steel privacy fence edges are razor-sharp and covered with jagged burrs. If left unpolished, they can easily injure workers and cause rainwater to pool and create turbulence.
Rainwater dripping along these burrs creates messy rust stains, contaminating the ground and significantly compromising the aesthetic quality of the landscape project.
Standardized Chamfering and Grinding Process
① Double-Sided Slag Removal
Using a 60-grit aluminum oxide flap wheel, tilt the grinder at a 15° angle to quickly remove surface slag and burrs from the cut edges, eliminating rough protrusions.
② Rounding and Blunting
Adjust the grinder’s angle to 45° to apply a micro-chamfer and round the edges. Standard acceptance criteria: When touching the edges with thick leather gloves, there should be no snagging or sharp sensations.
Two Grinding Solutions for Different Styles
① Vintage Rustic Style
Grind only the core area of the cut edge, preserving the steel plate’s original mill scale. Over time, the rust color on the cut edge will deepen slightly, creating a stronger sense of depth and highlighting the weathered, aged texture.
② Minimalist Modern Style
Use a 120grit fine sanding wheel to grind the area 1–2 cm around the cut edge, exposing the silver-white metal substrate. After artificial rusting, the rust color of the cut edge will match that of the outdoor metal screens surface, resulting in a uniform and consistent finish.
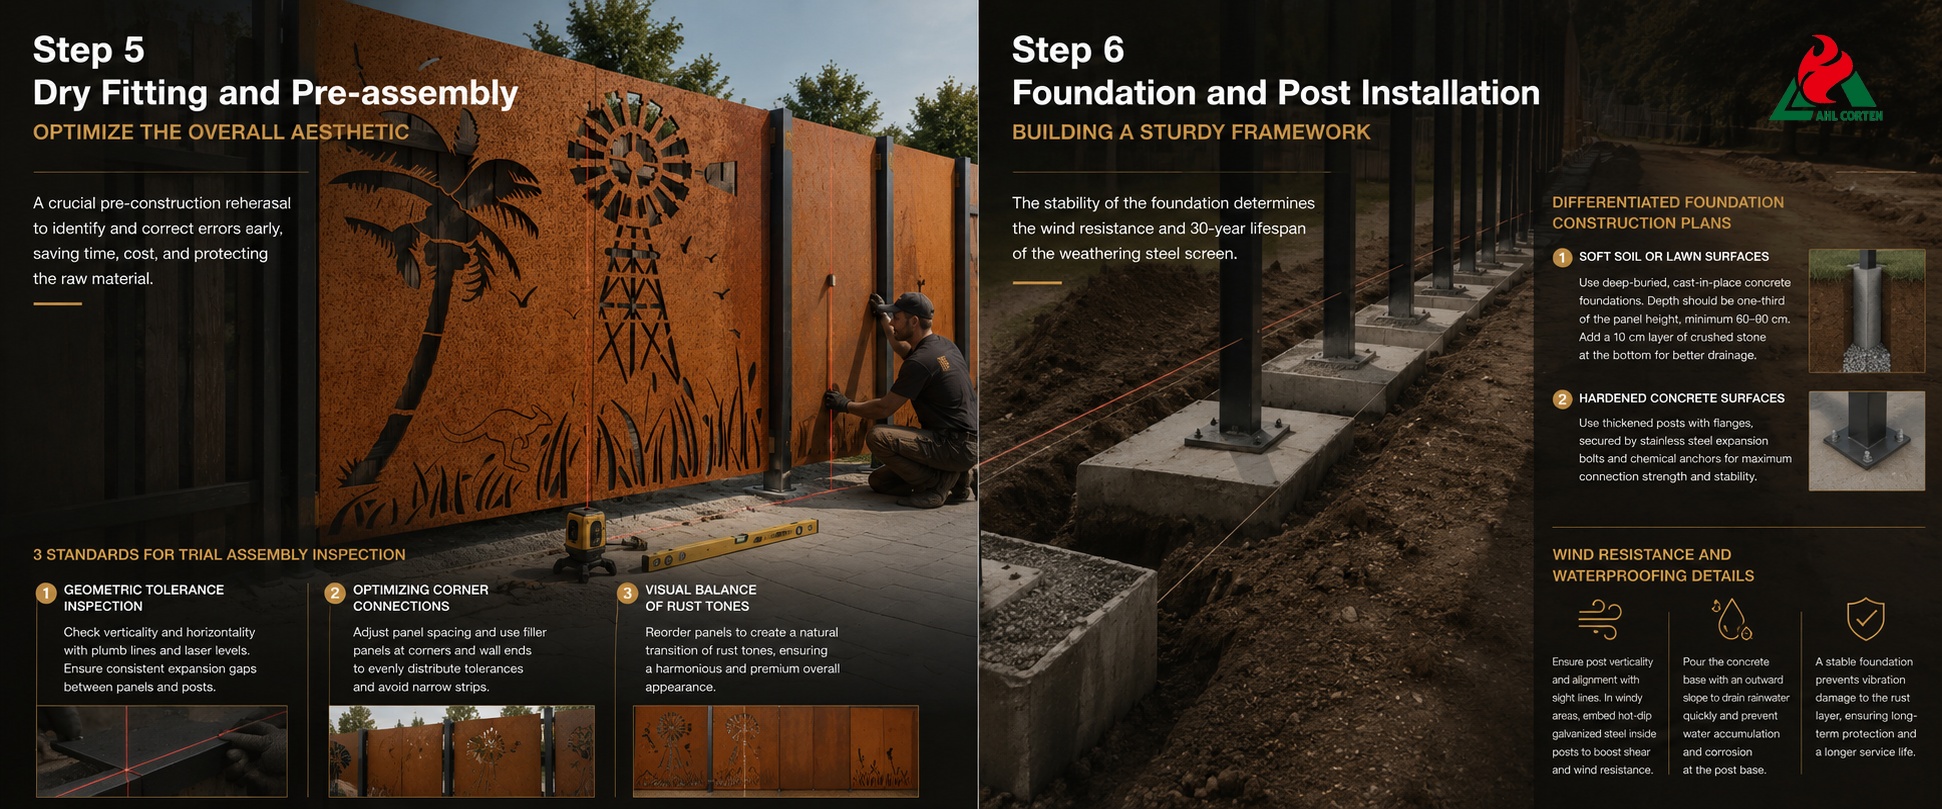
Step 5: Dry Fitting and Pre-assembly to Optimize the Overall Aesthetic of the Corten Steel Screen
The Core Significance of Fence Dry Fitting
After cutting and grinding are complete, do not proceed directly to welding or bolting. Dry fitting serves as a critical pre-construction rehearsal, allowing for the identification and correction of various minor errors without damaging the base material.
A ten-minute dry-fitting and adjustment session can prevent the high costs associated with later disassembly and rework, making it an extremely cost-effective construction step.
3 Standards for Trial Assembly Inspection
① Geometric Tolerance Inspection
Use plumb lines and laser levels to check the horizontal and vertical alignment of the panels, ensuring the top of the corten steel screen fence is flush. Simultaneously, inspect the expansion gaps between the panels and posts to ensure consistent, uniform spacing, eliminating a cheap, uneven appearance.
② Optimizing Corner Connections
At 90° corners and wall termination points, use filler panels as needed. During the trial assembly phase, fine-tune the spacing between standard panels to evenly distribute construction tolerances, preventing narrow-strip panels from appearing in prominent locations.
③ Visual Balance of Rust Tones
Pre-rusted panels may exhibit slight color variations due to storage conditions. During trial assembly, reorder the panels to create a natural transition between light and dark tones, avoiding abrupt local color differences and ensuring the overall rusted appearance is aesthetically harmonious.
Step 6: Foundation and Post Installation—Building a Sturdy Framework for the Rusted Steel Screen
The Importance of a Stable Foundation
If we compare a weathering steel screen fence to human skin, the posts and foundation serve as its load-bearing skeleton. Weathering steel plates with a thickness of 2.0–3.0 mm have significant weight, and outdoor fences have a large wind-exposed surface area.
The stability of the foundation directly determines the fence’s wind resistance and affects its service life of up to 30 years. Even slight vibrations caused by an unstable foundation can damage the surface rust-preventive layer, leading to localized, irregular corrosion.
Differentiated Foundation Construction Plans
① Soft Soil or Lawn Surfaces
Use a deep-buried, cast-in-place concrete foundation. The excavation depth must reach one-third of the plate height, with a minimum of 60–90 cm. Lay a 10 cm layer of crushed stone at the bottom of the pit to enhance drainage and prevent long-term waterlogging and corrosion at the base of the posts.
② Hardened Concrete Surfaces
Use thickened posts with flanges, secured with industrial-grade stainless steel expansion bolts and chemical anchors to ensure connection strength and stability.
Wind Resistance and Waterproofing Construction Details
Before pouring concrete, use a level to verify column verticality and snap a string line to ensure straight column alignment. In windy regions, embed hot-dip galvanized square steel within the columns to create a bimetallic composite structure, enhancing shear resistance and wind pressure resistance.
Pour the concrete column base with an outward-sloping gradient to rapidly drain rainwater, prevent water accumulation at the base, and avoid pitting corrosion caused by oxygen deprivation at the column base.
Step 7: Panel Installation and Fixing—Enhancing the Strength and Corrosion Resistance of the Screen
Challenges at Connection Points
Fixing points are the weakest links in the entire fence. Rough installation techniques not only cause metal friction noises but also easily trigger electrochemical corrosion between dissimilar metals, shortening the fence’s service life.
3 Standardized Principles for Fixture Installation
① Principle of Isolating Dissimilar Metal Corrosion
The use of ordinary galvanized screws or black iron bolts for fastening is strictly prohibited. Due to the unique electrochemical potential of weathering steel, combining it with ordinary metals will cause the screws to rust and break within 2–3 years.
Standard equipment includes 316 stainless steel bolts and Teflon anti-corrosion connectors. EPDM waterproof rubber washers are installed between the bolts and steel panels to physically isolate the electrical circuit while providing shock absorption and noise reduction.
② Principle of Allowing for Deformation and Expansion
Following the thermal expansion design logic outlined above, mounting holes are machined as elongated slotted holes, with a diameter 2–3 mm larger than the bolt diameter.
Bolts do not need to be tightened to the maximum; slight deformation of the rubber gasket is sufficient. This allows the panels room to expand and contract due to temperature changes, eliminating internal stress and preventing warping and cracking.
③ Bottom Ventilation and Clearance Principle
A 3–5 cm clearance gap should be maintained between the bottom of the panels and the foundation or soil. This prevents the corten steel screen panels from coming into direct contact with the ground, thereby stopping soil moisture from being drawn upward via capillary action.
The clearance design ensures air circulation at the bottom, allowing rainwater to dry quickly and preventing long-term moisture from causing peeling and corrosion at the base. It also enhances the fence’s sophisticated, suspended aesthetic.
Step 8: Post-Installation Maintenance and Management to Preserve the Aesthetic Appeal of the Screen
The Critical Importance of Initial Post-Installation Maintenance
Tightening the screws does not signify the end of installation. Newly installed weathering steel fencing is in a sensitive oxidation transition phase; the maintenance methods employed during the first four weeks after installation directly determine the texture and aesthetic quality of the rust layer in the long term.
Cleaning and Preparation at the Construction Site
Metal dust, sweat, fingerprints, and construction debris left over from cutting and installation must be thoroughly wiped away using a neutral cleaner and a low-pressure water stream.
If impurities remain, they will quickly form unsightly black spots, resulting in a mottled appearance on the panels and compromising the overall decorative effect.
.jpg)
Corten Steel Screen FAQ
1. Are the Cut Edges of Corten Steel Screens More Prone to Rusting After Cutting?
Cut edges that have been properly cut, ground, and passivated exhibit the same corrosion resistance as the surface of the laser cut privacy screens. We recommend cutting all the way through in a single pass to avoid high temperatures caused by repeated friction. AHL uses genuine SPA-H weathering steel, whose cut edges can naturally form a dense rust-preventive layer, enabling self-repair.
2. Does the Cutting Process Affect the Steel’s Weathering Performance?
High temperatures generated by low-quality, thick cutting blades can cause alloy loss within a 1–2 mm range around the cut edge, leading to peeling and blackening. Ultra-thin professional cutting blades and low-temperature cold-cutting processes do not compromise the steel’s weathering performance. Alternatively, you may opt for AHL’s factory laser pre-cutting service.
3. Can Anti-Rust Paint Be Applied to the Cut Edges of Corten Steel Screens?
We do not recommend applying standard anti-rust paint. The paint’s electrical potential is incompatible with that of weathering steel, making it highly prone to aging and cracking outdoors. Water accumulation can further exacerbate crevice corrosion. For projects sensitive to color differences, AHL’s specialized physical repair paste can be used to provide both protection and a natural patina effect.
4. How Should Protection Be Handled In Coastal Environments With High Salt Fog?
Within 5 kilometers of the coastline, chloride ions can inhibit the formation of a rust layer. We recommend using thickened SPA-H weathering steel of 3.0 mm or greater, paired with thickened rubber gaskets, and applying a brand-specific transparent protective coating designed for high salt fog environments.
5. How Can Rust Water From Weathering Steel Screens Be Prevented From Staining the Ground?
During the active oxidation period in the six months prior to installation, rust water poses a staining risk. For light-colored stone surfaces, a 15–20 cm gravel trench can be laid beneath the fence to divert rust water into the soil; alternatively, a factory pre-rusting and color-fixing service can be arranged in advance.
6. Is Corten Steel Screen Suitable for DIY Installation or Professional Installation?
For 1.5–2.0 mm thin sheets and small garden fences, DIY installation is feasible provided you have basic tools and protective measures in place. For sheet 3.0mm or thicker) long-distance fencing, or projects on sloped terrain, it is recommended to hire a professional installation team to ensure structural wind resistance and stability.
7. How Can the Aesthetics of Corten Steel Fence Panel Corners Be Optimized?
On-site, the cut edges of two panels can be sanded to a 45° angle for seamless right-angle joints; for minimalist installation, AHL’s custom-made 90° corner components can be used, eliminating the need for on-site cutting and splicing.
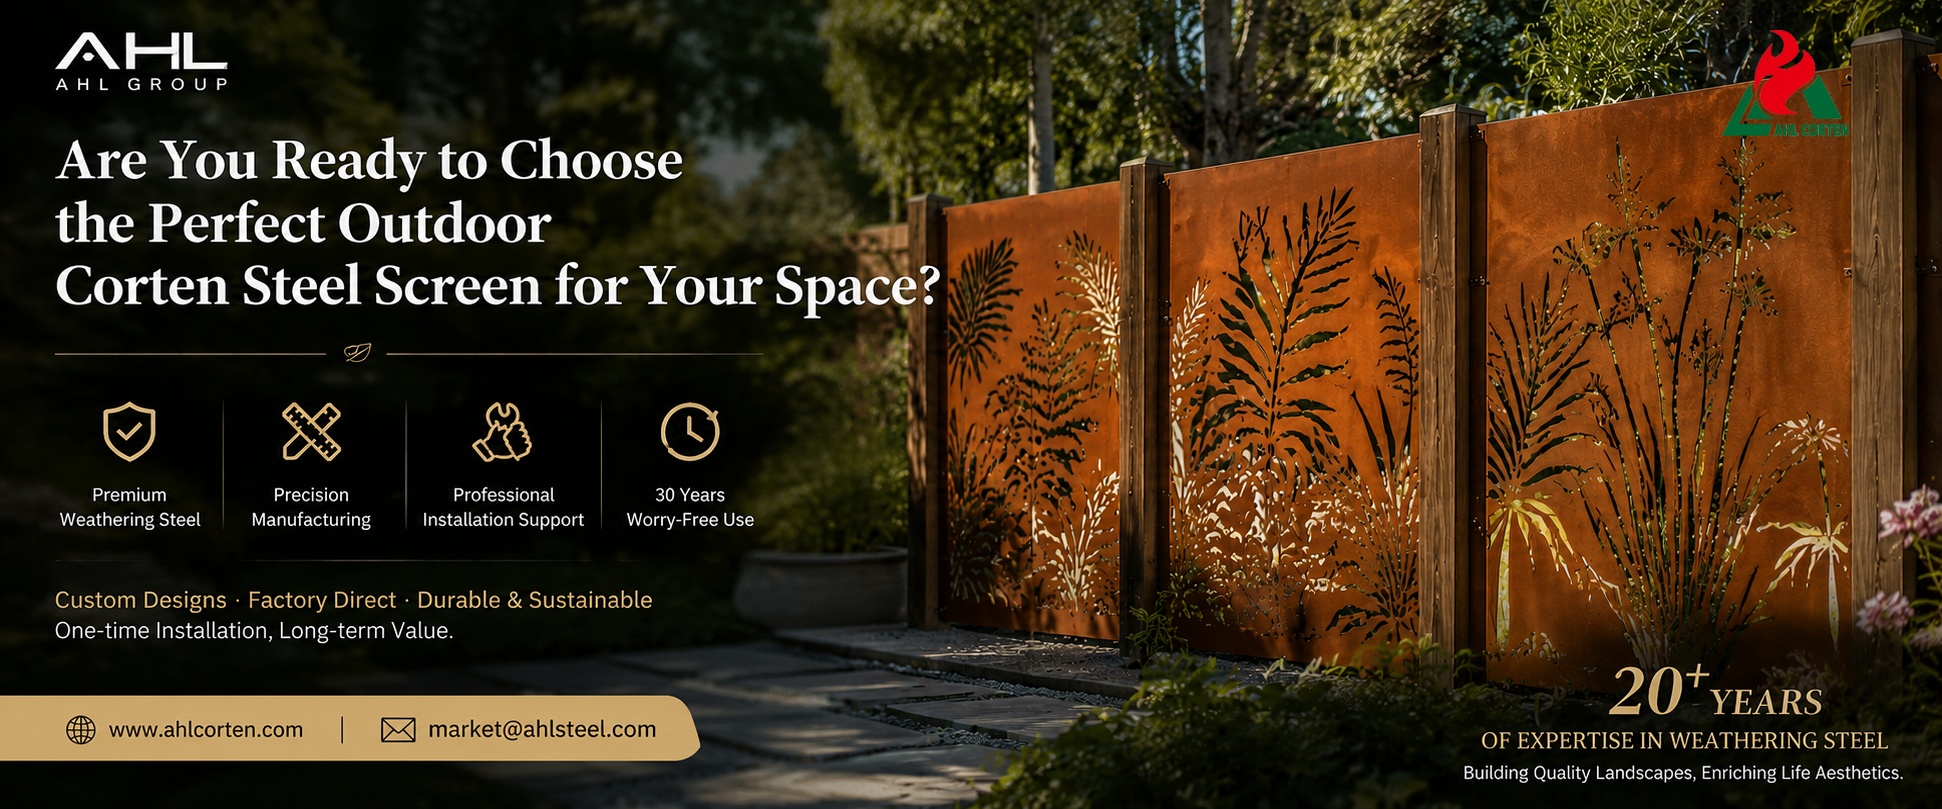
Are You Ready to Choose the Perfect Outdoor Corten Steel Screen for Your Space?
Corten fence panels are not ordinary metal sheets, but landscape building materials that combine artistic appeal with industrial standards. From precise measurement and scientific cutting to foundation reinforcement and corrosion-resistant fastening, every step of the process determines the quality of the project.
Strictly following the eight key installation steps can effectively reduce the likelihood of rework, ensuring a natural rust color transition and a structurally stable, durable fence. Attention to detail and standardized construction are the core elements of high-end weathering steel landscape projects.
With 20 years of deep expertise in the weathering steel industry, AHL Group specializes in the R&D and production of high-quality weathering steel fences. Leveraging precision factory processing, comprehensive technical guidance, and robust after-sales support, we create premium weathering steel screen fences for residential, commercial, and municipal projects that combine aesthetic appeal with longevity—ensuring a one-time installation and 30 years of worry-free use. Contact us for a free catalog and quote!
Back