How to Set Up a Corten Steel Planter (Step-by-Step Guide) | AHL
Date:2026.05.18
Share to:
Corten steel planters have become a popular choice for garden and commercial landscaping thanks to their industrial, vintage aesthetic and natural rusting texture. However, most beginners have many concerns once they receive their planters. The most common concerns center on three points: Does the steel need to be waterproofed? Will direct contact between the soil and the steel plate cause rust to penetrate? Will rust water stain expensive paving? In addition, the metal’s high thermal conductivity is a source of concern. Will the intense summer heat burn the plant roots? How can root rot be prevented if drainage is poor? These concerns are all valid. Unlike ceramic or plastic pots, rusted steel planters are living landscape installations. Many users overlook drainage systems, ground isolation, and stain prevention during initial setup. This directly leads to two consequences: either the plants will suffer from root rot and wither within a short period, or stubborn rust stains will remain on the ground, resulting in extremely high costs for rework. This article will explain the standardized installation process for corten garden bed planters in an easy-to-understand, step-by-step practical guide. By following a scientifically configured drainage layer, spacers, and planting medium, you can achieve a low-maintenance installation that can last 30+ years with minimal upkeep, creating a long-lasting and aesthetically pleasing landscape.
Essential Checklist Before Installing a Corten Steel Planter
Beginners should not blindly unpack and fill the planter with soil; having all the necessary components is the foundation of a successful installation. Core components include: planter riser blocks, geotextile fabric, expanded clay aggregate, and insulation foam boards. This simple combination of components simultaneously addresses multiple issues such as rust water contamination, root frostbite, and root rot caused by waterlogging. All installation procedures follow one core principle: a single standardized installation ensures long-term maintenance-free operation. High-quality rusted metal planter boxes come factory-equipped with a scientific drainage system, eliminating the need for manual drilling and avoiding issues such as steel damage, leaks, and deformation caused by DIY modifications. AHL adheres to a philosophy of simplified landscaping, reducing complex landscape projects to a modular assembly process. Whether handled by professional installation teams or gardening enthusiasts, standardized planting of a single corten planter box can be completed in just 15 minutes.
Site Selection and Placement of Corten Steel Planters
1. Light and Wind: Controlling the Pace of Rust Formation
Sunlight is the core factor in the formation of a high-quality rust layer on weathering steel planters. Ample sunlight accelerates the drying of the planter after rain, and the cycle of wet and dry conditions promotes the development of a dense, bronze-colored rust layer that protects against corrosion. If left in a dark, damp corner for an extended period, the steel is prone to turning black and the rust layer may peel off, compromising the overall aesthetic appeal. Important notes for windy balconies and areas with strong northern winds: Strong winds accelerate soil moisture evaporation. Use a growing medium with better water retention and ensure proper bottom ballast to prevent the planter from tipping over due to being top-heavy.
Weathering steel planter boxes undergo an active oxidation phase during the first 6 months, during which rain may wash away small amounts of rust particles. Treatment should be tailored to the specific surface material. Lawns and dirt surfaces: No protection is needed; rainwater contains trace amounts of iron, which can serve as a natural plant nutrient. Light-colored stone, concrete, and wooden decks: Must be elevated 1–2 cm using spacers to prevent the planter’s base from touching the ground, thereby avoiding the lateral spread of rust water and the formation of stubborn stains.
3. Placement Taboos: Avoid Low-Lying, Water-Prone Areas
Never place corten steel raised bed planters in low-lying areas of the yard or near drainage outlets. Prolonged water accumulation can cause oxygen deprivation at the bottom of the planter, triggering electrochemical corrosion and resulting in abnormal thinning and deterioration of the steel.
4. Quick Site Selection Rules: Drainage · Ventilation · Sunlight
Keep the core principles of site selection in mind: good drainage, ventilation, and sunlight. Leave breathing space at the bottom; the steel will develop a patina over time, giving it an increasingly sophisticated texture.
Rusted Steel Plant Pot Drainage System Inspection: The Lifeline of Plant Survival
Drainage Hole Inspection: Clearing the Bottom’s Lifeline
Before filling with soil, be sure to turn the planter upside down and inspect the drainage holes at the bottom of the corten steel planter. Remove any packaging debris, welding slag, or label residue to ensure the holes remain unobstructed. AHL round corten planters are engineered with precise drainage calculations, featuring scientifically optimized hole diameters and spacing. This design ensures rapid drainage even during heavy rain, preventing water accumulation at the bottom.
Rectangular Planter Liner Selection: Choosing the Right Insulation Solution Based on Climate
Option 1: Bare Planting Without Liner
Suitable for mild climates and ideal for drought-tolerant native plants such as ornamental grasses, succulents, and shrubs. The advantage is the fastest drainage rate, with direct contact between the soil and steel, maximizing aeration. Contraindications: Do not use in regions with temperatures below -15°C or above 40°C, as extreme temperature fluctuations can cause root burns or frostbite.
Option 2: Foam Insulation Liner
Suitable for extremely cold or hot regions, as well as delicate plants with sensitive root systems. A 20mm foam board creates a microclimate that insulates against extreme temperatures. Installation Note: Leave a drainage gap at the bottom of the liner. Never block the drainage holes to prevent waterlogging and root rot.
2 Critical Drainage Mistakes for Beginners
Mistake 1: Skipping the drainage layer and filling directly with soil. Fine soil settles when wet, easily clogging drainage holes—the primary cause of root rot in houseplants. Mistake 2: Overfilling with soil or using heavy, clay-based soil. During heavy rain, muddy water overflows and contaminates the ground; once heavy, clay-based soil compacts, water cannot permeate and drain away.
Corten Planter Layered Soil Mix: A Sustainable Substrate to Reduce Long-Term Maintenance Costs
1. Bottom Drainage Layer: Creating a Bottom Air Channel
Lay 5–10 cm of expanded clay pellets and crushed stone at the bottom of large outdoor planters, occupying 10%–15% of the planter’s height, to form a drainage layer. Lay a layer of geotextile fabric over the gravel to filter the soil and allow water to pass through, preventing fine soil from leaking through and clogging drainage holes.
2. Middle Planting Layer: Balancing Aeration and Water Retention
Mix coarse sand, peat moss, and perlite in the lower soil layer to improve permeability; in the upper core planting area, combine coconut coir and leaf mold to lock in moisture and mitigate the problem of soil drying out due to high steel plate temperatures in summer.
3. Customized Soil Mixes: Tailored Formulas for Different Plants
Herbaceous Flowers: Add peat moss and vermiculite to create a loose, fertile soil suitable for the rapid growth of shallow root systems. Ornamental Grasses: Incorporate 20%–30% fine sand and gravel to simulate a barren, rocky environment, preventing waterlogging and root rot. Shrubs and Small Trees: Mix in pine bark and volcanic rock to prevent soil compaction, supporting long-term growth without the need for repotting.
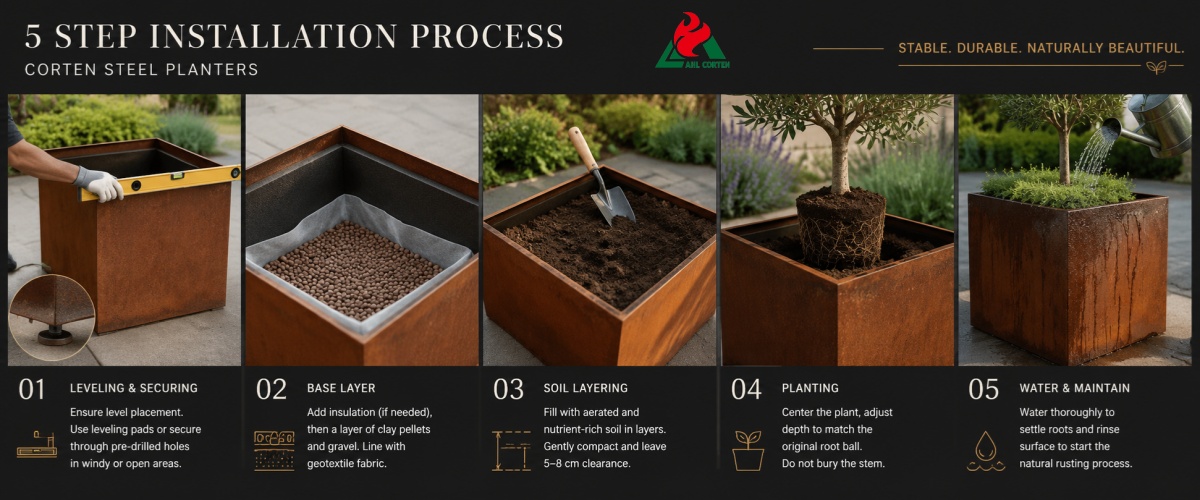
5 Step Standardized Installation Process for Corten Steel Planters
1. Leveling and Securing: Eliminate Wobbling and Tilting
Before filling with soil, determine the placement of the rusted steel planter and use a level to align the planter’s edges. Compact the soil surface in advance; for hard surfaces, install leveling pads. In open, windy areas or on high-rise terraces, use the pre-drilled mounting holes at the bottom to secure the planter and prevent it from tipping over in strong winds.
2. Laying the Base Layer
In areas with extreme weather, first install foam insulation panels against the inner walls; then evenly spread expanded clay pellets and gravel. Lay geotextile fabric flat, tucking the edges up 5 cm to create a tight seal against the soil.
3. Layering Soil and Leaving a Clear Space
Fill the planter in layers with aerated soil and nutrient-rich soil, gently compacting each layer—never stomp on the soil. Use the original pot as a height reference and leave a 5–8 cm clearance at the top to prevent water from overflowing.
4. Planting and Controlling Depth
After removing the plant from its pot, untangle any tangled or aged roots and position the plant in the center. Fill the planter so the soil level is flush with the original root ball; never bury the plant’s stem to prevent root suffocation and death.
5. Water to Settle Roots, Clean and Maintain
After planting, water thoroughly until clear water drains from the bottom. Simultaneously, rinse dust from the planter’s surface to complete the first wet-dry cycle, which helps the steel develop a natural rust patina.
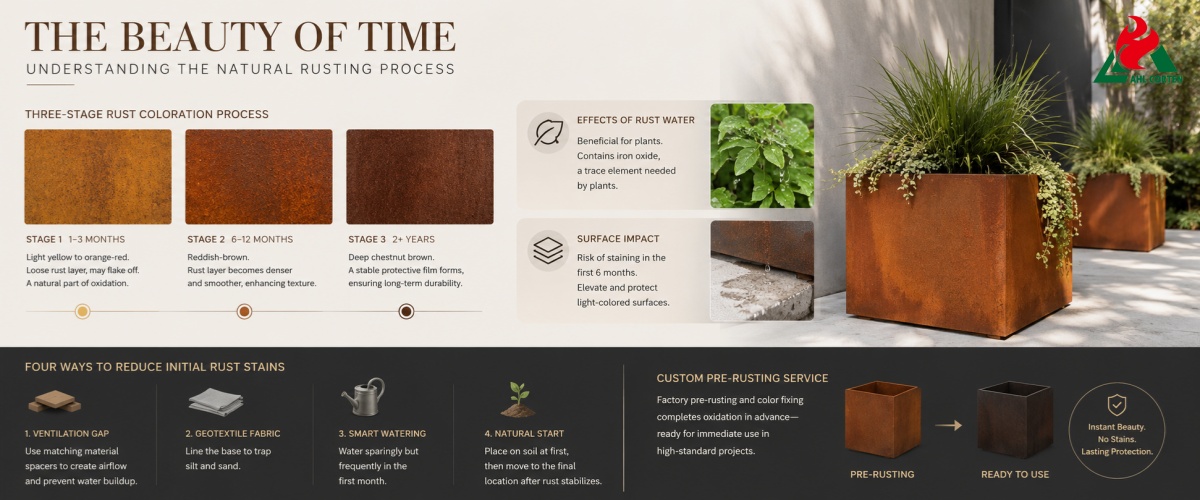
Understanding the Natural Oxidation Process of Weathering Steel Planters
Three-Stage Rust Coloration Process
Stage 1 (1–3 months): The surface turns light yellow or orange-red. The rust layer is loose and prone to flaking off, which is a normal part of the initial oxidation phase.
Stage 2 (6–12 months): The color shifts to reddish-brown. The rust layer gradually becomes dense and smooth, enhancing the texture.
Stage 3 (2+ years): Settles into a deep chestnut brown, forming a stable protective film, and the steel enters a state of long-term corrosion resistance.
Explanation of the Effects of Rust Water
For Plants: Rust water contains iron oxide, which is a trace element required by plants and has no toxic side effects.
On Surfaces: There is a risk of staining during the first 6 months; light-colored hard surfaces must be elevated and protected.
Four Methods to Reduce Initial Rust Stains
1. Use standard-issue spacers made of the same material to create ventilation gaps;
2. Lay geotextile fabric to trap silt and sand;
3. Water sparingly but frequently during the first month;
4. Temporarily place the steel on a dirt surface initially, then relocate it to the final installation area once the rust layer has stabilized.
Custom Pre-Rusting Service
If you seek an aesthetically pleasing, stain-free result immediately upon installation, you may opt for our factory pre-rusting and color-fixing process. This completes the oxidation process in advance, allowing the plants to be used directly in high-standard landscaping projects.
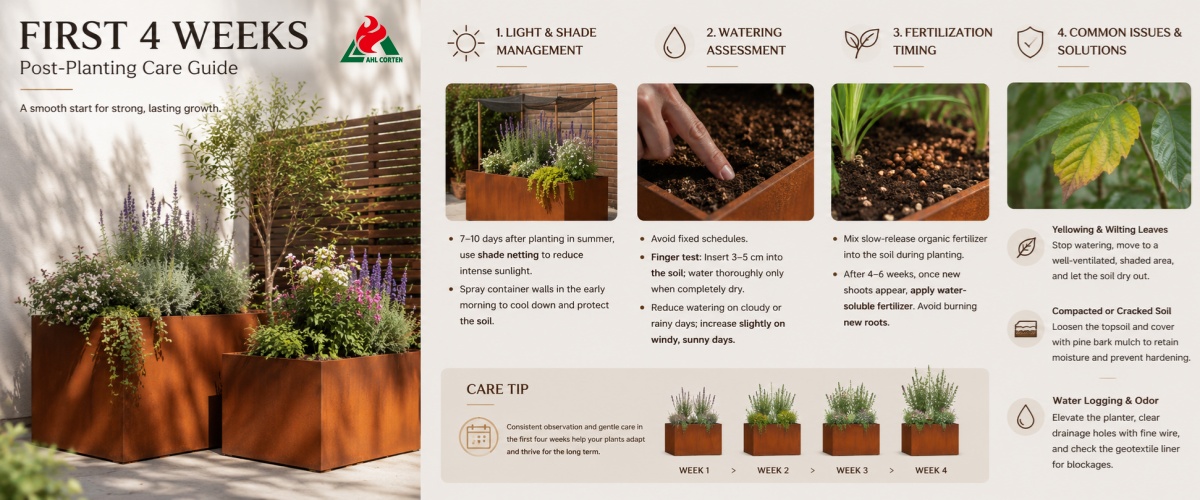
Post-Planting Care for the First 4 Weeks: Smoothly Navigating the Critical Acclimatization Period
1. Light and Shade Management
7–10 days after summer planting, use shade netting to reduce intense sunlight. Spray the exterior walls of the container early in the morning to lower temperatures and prevent the steel plates from baking the potting soil.
2. Watering Assessment Techniques
Avoid fixed watering schedules; instead, use the finger test: insert your finger 3–5 cm into the soil; water thoroughly only after the soil is completely dry. Reduce watering during cloudy or rainy weather, and increase humidity slightly on windy, sunny days.
3. Optimal Fertilization Timing
Mix slow-release organic fertilizer into the soil during planting to provide a gentle supply of nutrients. After 4–6 weeks of planting, once new shoots have emerged, apply water-soluble fertilizer to avoid burning the new roots.
4. Common Issues and Solutions for Corten Steel Rectangular Planters
Yellowing and Wilting Leaves: Stop watering, move to a well-ventilated, shaded area, and wait for the soil to dry out.
Compacted or Cracked Soil: Loosen the topsoil and cover the surface with pine bark mulch to retain moisture and prevent hardening.
Water Logging and Odor at the Bottom: Elevate the planter, use fine wire to clear drainage holes, and check for blockages in the geotextile liner.
Beginner’s Buying Guide: Choosing the Right Rusty Metal Planter Boxes for Maximum Efficiency
Five Self-Check Standards for Purchasing
1. Drainage Holes: Hole diameter 15–20 mm, evenly distributed; one drainage hole every 30 cm for long planters; 2. Dimensions and Depth: Depth ≥50 cm for small trees, 20–30 cm for herbaceous flowers to prevent waterlogging; 3. Accessories: Standard factory-supplied riser blocks; large planters feature built-in reinforcement supports; 4. Packaging: Multi-layer protective packaging to prevent physical damage or scratches during transport; 5. Steel Thickness: 1.5–2.0 mm for residential use; 3.0 mm for commercial projects to prevent deformation and cracking.
Scenario-Based Purchasing Recommendations
Planting Red Maple in a Hardened Terrace: Opt for the 2.0mm thickened corten steel planters, paired with a concealed drainage base and thermal insulation liner;
Courtyard Ornamental Grass Landscaping: Choose basic, unlined planters for a low-cost, natural, rustic landscape.
Frequently Asked Questions for Beginners: All Your Questions Answered
1. Do the Inner Walls of the Planters Need to be Waterproofed?
Genuine SPA-H weathering steel requires no anti-corrosion or waterproofing treatment, as it naturally forms a rust-resistant protective layer. Only in regions with extreme climates is it recommended to install a foam liner for insulation and root protection.
2. How Can Rust Stains On The Ground Be Completely Prevented?
Combined protection solution: Raised spacers + geotextile fabric. For high-standard projects, factory pre-rusting and color-fixing services are available upon request.
3. Can Corten Planters Be Used In High-Humidity Coastal Environments?
Yes, they can be used. We recommend selecting thickened weathering steel of 2.0mm or greater to withstand salt spray and humid conditions, thereby extending the product’s lifespan.
4. Is Uneven Rust Patina a Quality Issue?
This is a normal phenomenon. Influenced by sunlight and wind, the rust will naturally settle and even out over six months to a year, forming a uniform, vintage-style patina.
Ready to Choose the Perfect Outdoor Corten Steel Planter for You?
A weathered steel planter is not just a simple metal container—it’s a miniature landscape ecosystem. By focusing on four key aspects—proper site selection and elevation, layered soil filling, drainage protection, and initial maintenance—you can ensure it lasts for thirty years. Set aside conventional pot-care mindsets and embrace the natural properties of steel to achieve both healthy plants and an aesthetically pleasing planter.
Request a Quote Now: Secure Your Custom Solution
✅ Free One-on-One Custom Quote: Not sure which style suits your space? Unsure about the right soil mix for your plants? Message our technical team right away. Based on your installation location, plant types, and project context, we’ll tailor the planter specifications, elevation solutions, and drainage systems to your needs. Get an accurate quote quickly—with no hidden fees. ✅ Bulk Customization for Construction Projects: For commercial landscaping projects such as hotels, shopping districts, and villa communities, we offer expedited customization options including reinforced panels, insulated liners, and concealed drainage bases. All structures are factory-prefabricated for on-site installation, significantly reducing rework costs. Contact us for bulk quotes and project-exclusive pricing.