In contemporary outdoor design, corten privacy screens have become a popular choice for gardens, patios, and commercial spaces due to their exceptional durability, distinctive aesthetic appeal, and low maintenance requirements. Not only do they create private outdoor environments, but their naturally rusted, orange-brown finish also lends spaces a vintage industrial charm or a rustic, natural appeal.
However, achieving optimal results with laser-cut metal screenshinges on correct installation procedures. This guide comprehensively breaks down installation details—from preliminary planning and tool preparation to various mounting methods (wall-mounted, freestanding, fence integration) and post-installation maintenance—empowering you to transition from design to completion seamlessly.
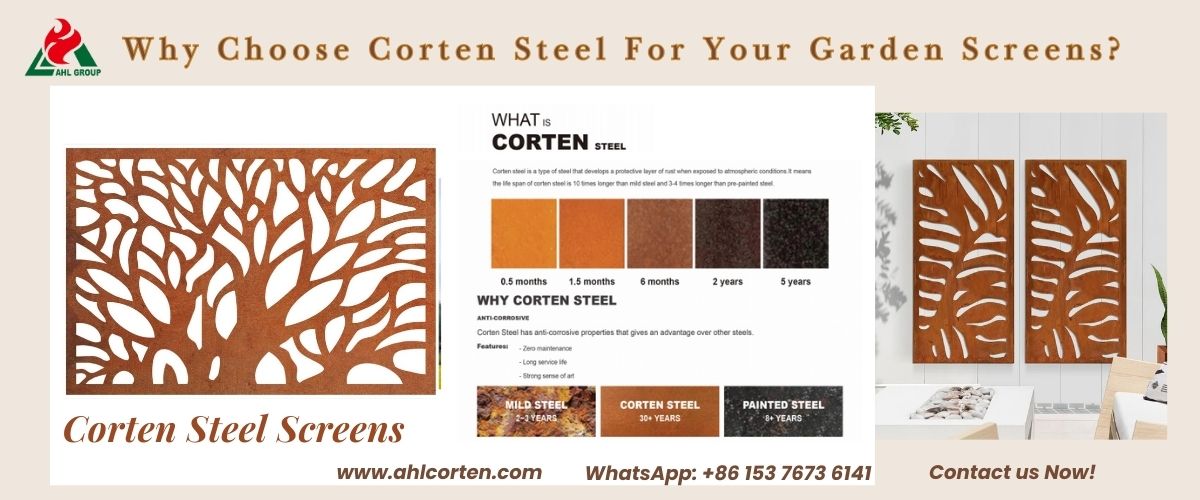
Corten steel is a special alloy steel containing copper, chromium, and nickel, whose core advantage lies in its natural formation of a dense oxidised rust layer when exposed to air and moisture.
This rust layer acts as a barrier against corrosion, enabling the screens to withstand harsh outdoor environments without requiring paint or anti-corrosion coatings. It will not flake off and gradually stabilizes over time.
Garden screens transition from a silvery-grey hue to an orange-brown, ultimately developing into a deep, uniform rust-red colour. Each screen possesses a unique visual character.
2. Reasons to Choose Corten Privacy Screens
Exceptional Durability: Under normal installation and use, lifespan exceeds 50 years – far surpassing wooden or plastic privacy screens (typically requiring replacement every 3-5 years).
Low Maintenance: Requires no regular cleaning or painting; simply allow the natural patina to occur, resulting in virtually zero upkeep.
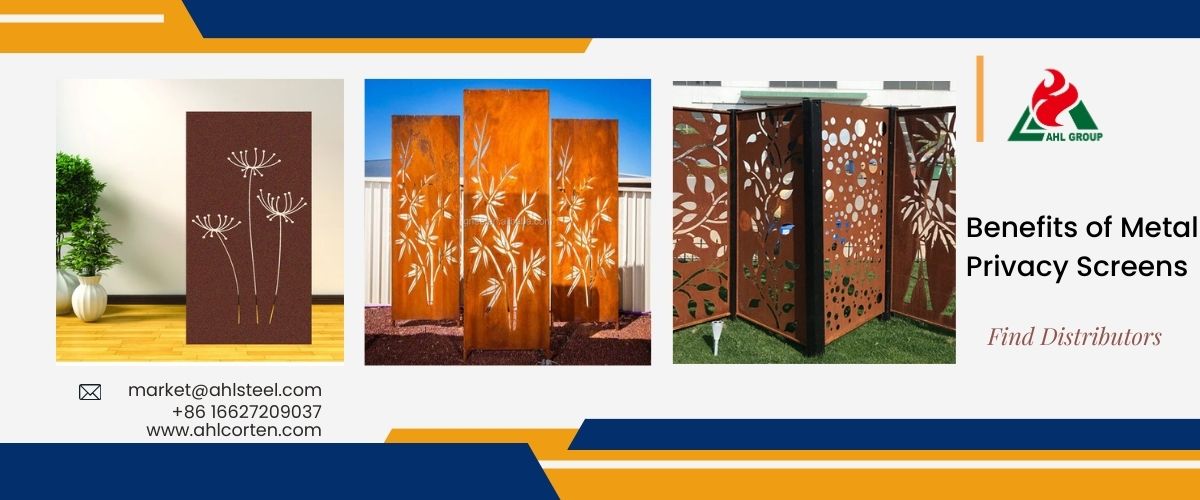
Design Flexibility: Customisable geometric patterns, botanical motifs, abstract forms, and more, complementing contemporary, natural, industrial, and diverse styles;
Eco-Sustainability: 100% recyclable materials with production processes free from toxic coatings, aligning with green design principles;
Cost-Effectiveness: Though initial procurement costs are slightly higher, the long-term absence of replacement and maintenance requirements results in significantly lower overall costs compared to traditional materials.
3. Common Corten Privacy Screen Designs
Geometric Patterns: Minimalist hexagons, grids, or linear forms suit contemporary gardens or commercial spaces;
Natural Motifs: Leaf, vine, or branch patterns blend seamlessly with garden foliage to create an organic ambience.
Custom Art Designs: Engraved with letters, logos, or abstract patterns to create bespoke visual focal points;
Combination Designs: Pairing openwork panels with solid panels to balance privacy and light transmission while adding dimensionality.
Pre-Installation Planning for Corten Steel Screens
1. Define Installation Type and Settings
First, determine the installation method based on the usage scenario. Common types include:
Wall-mounted: Fixed to walls (brick, concrete, timber), suitable for patios, balconies, and similar spaces to conserve floor area;
Freestanding:Supported by posts, placed independently in gardens to flexibly divide areas, such as separating leisure zones from planting areas.
Fence-integrated: Embedded into existing fencing or incorporated as part of new fencing, enhancing privacy while improving aesthetics;
Building cladding: Serves as partial exterior decoration or privacy screening for structures, concealing equipment like air conditioning units or pipes.
2. Site Survey and Measurement
Confirm installation location: Determine positioning based on privacy requirements (e.g., blocking neighbours' sightlines, defining functional zones) while avoiding underground utilities (contact property management for utility maps) and obstacles like tree roots.
Measure dimensions: Use a tape measure to accurately record the height and width of the installation area, ensuring the screen size matches the space (allow a 5-10cm tolerance to prevent oversizing or undersizing).
Inspect ground/wall conditions: For freestanding metal screens, verify ground levelness; slope must be levelled beforehand. For wall-mounted screens, verify wall load-bearing capacity (brick or concrete walls are sufficient; lightweight partition walls require additional reinforcement).
3. Prepare Tools and Materials
(1) Essential Materials List
Corten steel screen panels (custom-made to design dimensions; recommended thickness 3-6mm for balance of strength and installation ease);
Support structure: Wall-mounted units require metal mounting brackets (minimum 2 per panel); freestanding units require timber/metal uprights (timber must be treated for rot resistance; metal should be hot-dip galvanised steel or corten steel to prevent galvanic corrosion from material mismatch);
Safety tools: non-slip gloves, safety goggles, dust mask (to prevent metal splinters during drilling).
4. Design Detail Confirmation
Height and width: Recommended privacy screen height is 1.5–2.2 metres (too low fails to block sightlines, too high impedes ventilation and aesthetics); width determined by panel dimensions, with individual panels advised not to exceed 2 metres to avoid installation difficulties or subsequent warping;
Privacy and light transmission: For complete obstruction, select solid panels or high-density perforated panels; For balanced light transmission, opt for large-aperture perforated patterns or combine solid and perforated panels.
Drainage Considerations: Regardless of installation method, ensure drainage space at the screen base (e.g., 5–10cm clearance from ground for wall-mounted panels; gravel base for freestanding columns) to prevent accelerated rusting from rainwater accumulation.
Using a tape measure and marker pen, mark the installation height of the metal privacy screen on the wall (recommended bottom clearance of 5-10cm from floor level to prevent water ingress from standing water).
Determine mounting bracket positions based on corten steel screen dimensions: Each panel requires at least two brackets spaced no more than 1 metre apart, avoiding perforated sections to ensure secure fixation;
Calibrate markings with a spirit level to ensure bracket alignment is horizontal, preventing screen tilt after installation.
Step 2: Installing the Fixed Brackets
Select drilling tools according to wall material: masonry drill bits for brick/concrete walls; wood drill bits for timber walls;
Drill holes at marked positions, ensuring hole depth exceeds screw length by 5-10mm (e.g., 55-60mm for 5×50mm screws);
Align brackets with drilled holes and secure using 5×50mm self-tapping screws. Use at least 3 screws per bracket to ensure tight contact with the wall surface.
After installation, recheck bracket levelness with a spirit level. Adjust screw positions slightly if any deviation is detected.
Step 3: Pre-treating the Screen Panels
Using a metal drill bit, drill 2-3 drainage holes (5mm diameter, spaced 30-50cm apart) along the bottom edge of each panel to prevent rainwater accumulation between the panel and the wall.
Wipe the panel surface with a soft cloth to remove any factory dust or oil residue, preventing subsequent rusting.
If sharp burrs are present along the panel edges, gently sand them down to prevent hand injuries during installation.
Step 4: Securing the Screen Panel
With two people working together, lift the screen panel into position against the wall bracket, ensuring the panel's bottom aligns with the marked height.
Secure the panel to the bracket using screws, employing at least two screws per bracket (stainless steel screws are recommended to prevent galvanic corrosion with corten steel).
During installation, use a spirit level to verify vertical alignment. Adjust screw tension if any tilt is detected.
For multiple panels, ensure uniform spacing between outdoor metal panels (recommended 5–10mm to allow for thermal expansion) and consistent height.
Wall-Mount Installation Tips
For lightweight partition walls (e.g., plasterboard), first install metal studs within the wall before securing brackets to these studs. This prevents screen detachment due to insufficient wall load-bearing capacity.
For installations at greater heights, use ladders or scaffolding to ensure safety. Never stand on unstable objects during operation.
If incorporating lighting (e.g., wall-washing lights, string lights) onto the screen, pre-drill cable holes during installation or secure light fixtures to the brackets to avoid damaging panels by drilling later.
Determine post spacing based on metal privacy screen dimensions: For a single screen panel width of 1.5 metres, a recommended post spacing of 1.5–1.6 metres is advised (allowing space for panel installation).
Mark pillar positions on the ground using a tape measure and a marker pen. For multiple panels, use a string to establish straight lines, ensuring all pillars align.
Pillar quantity calculation: Each single panel requires 2 pillars. Continuous panels may share central pillars (e.g., 3 panels require 4 pillars).
2. Step 2: Excavating Post Holes
Dig post holes using a spade or electric auger. Holes should be one-third the post length deep (e.g., 60cm for an 1.8m post) and 10-15cm wider in diameter than the post (to facilitate concrete filling).
If the soil is loose, deepen the pit appropriately (e.g., by an additional 10–15 cm) or lay a 10 cm layer of crushed stone at the base for enhanced stability;
Clear debris from the pit after excavation and ensure vertical walls to prevent future post tilting.
3. Step 3: Securing the Posts
Post preparation: For timber posts, apply preservative coating to the base; for metal posts, wrap the base with waterproof tape to prevent direct contact with concrete, causing corrosion.
Positioning the posts: Place the posts into the pits and use a spirit level to verify vertical alignment (front-to-back and side-to-side). Ensure all posts are at the same height (recommended 1.5–2.2 metres above ground level, adjusted according to screen height).
Pouring concrete: Mix ready-mix concrete according to instructions (quick-setting concrete is not recommended as rapid setting may cause cracking). Pour into the pit while compacting with a wooden rod to expel air bubbles and ensure dense concrete.
Second calibration: After pouring, recheck column verticality with a spirit level. Adjust promptly if deviation occurs (minor adjustments possible before initial setting). ;
Curing: Allow concrete to cure for 7–10 days, avoiding contact with columns during this period. Cover with plastic sheeting during rainfall to prevent washout.
Step 4: Installing Screen Panels
Once the columns are cured, fit mounting brackets to both sides of each panel (minimum 2 per side, evenly spaced vertically). Pre-drill holes using a metal drill bit to prevent panel distortion.
With two people working together, lift the panel into position against the column. Secure the brackets to the column with screws, ensuring the panel is vertical and tightly flush with the column.
When installing multiple panels, adjust the spacing between the outdoor metal privacy screens (5-10mm) to ensure overall flatness. Verify that all panels lie in the same plane to prevent unevenness.
Step 5: Finishing Touches
Backfill soil around columns: Fill the outer perimeter of the concrete with original soil, gently compacting it while creating an outward slope (5°-10°) to prevent rainwater accumulation at column bases;
Clean laser-cut metal screens: Wipe dust and concrete residue from panel surfaces with a soft cloth to prevent impurities from affecting rusting.
Check for stability: Gently rock the screen by hand. If the columns show no noticeable sway, installation is secure. If sway occurs, verify concrete compaction or assess whether additional support is required.
Tips for Freestanding Installation • In areas with high wind speeds (e.g., coastal regions, plateaus), increase the column diameter (recommended minimum 10cm) or add horizontal bracing at the base to enhance wind resistance; • For screens exceeding 2 metres in height, incorporate additional central posts to prevent sagging due to excessive panel length; • For screens requiring relocation (e.g., layout adjustments), opt for a ‘detachable’ design: secure posts with embedded sleeves rather than concrete foundations, enabling future removal and repositioning.
Post-Installation: Initial Care and Long-Term Maintenance
1. Initial Rusting Care (Critical 6-Month Period)
Allow natural rusting: After installation, no cleaning or treatment is required. Expose the corten steel privacy screen to the air to allow a rust layer to form naturally. During the initial period (1-3 months), rust water runoff may occur. If the surface below is tiled or wooden decking, lay down waterproof sheeting or gravel to prevent staining (rust water runoff will diminish after 6 months when the rust layer stabilises).
Avoid chemical contact: For the first year after installation, prevent the laser-cut outdoor screen from coming into contact with chemicals such as weedkillers, fertilisers, or de-icing agents. These substances can damage the rust layer, leading to localised excessive corrosion.
Do not cover or seal: Refrain from painting, oiling, or applying waterproof membranes to the panel surface. Such treatments seal the surface, inhibiting rust layer formation and accelerating internal corrosion.
2. Long-Term Maintenance
Periodically inspect fixings: Each spring, check for loose screws or brackets. Tighten immediately if found loose (slight loosening of metal fixings due to temperature changes is normal).
Clear surface debris: Should dust or fallen leaves accumulate on the panel surface, gently wipe with a soft cloth or clean water. Avoid using cleaning agents (acidic or alkaline cleaners will damage the rust layer).
3. Addressing Common Issues
Localised rust layer loss: If a localised area of rust layer is chipped off due to impact, no special treatment is required. Allow it to rust naturally; a new rust layer will reform within 1-2 months.
Minor panel deformation: Should excessive wind cause slight bending, gently press to realign (corten steel possesses inherent resilience, allowing minor distortions to recover).
Rusted fixings: Replace rusted screws or brackets with stainless steel alternatives to prevent corrosion spreading to the panel surface.
Invest in a Corten steel privacy screen—where enduring durability meets timeless style. Let it transform your outdoor space into a private, charming retreat with zero long-term hassle, while its unique patina evolves beautifully over decades. Elevate your outdoor living today—your garden, patio, or commercial space deserves a statement piece that lasts a lifetime.

.jpg)