10 Steps for Cutting and Installing Corten Edgings
Date:2026.03.23
Share to:
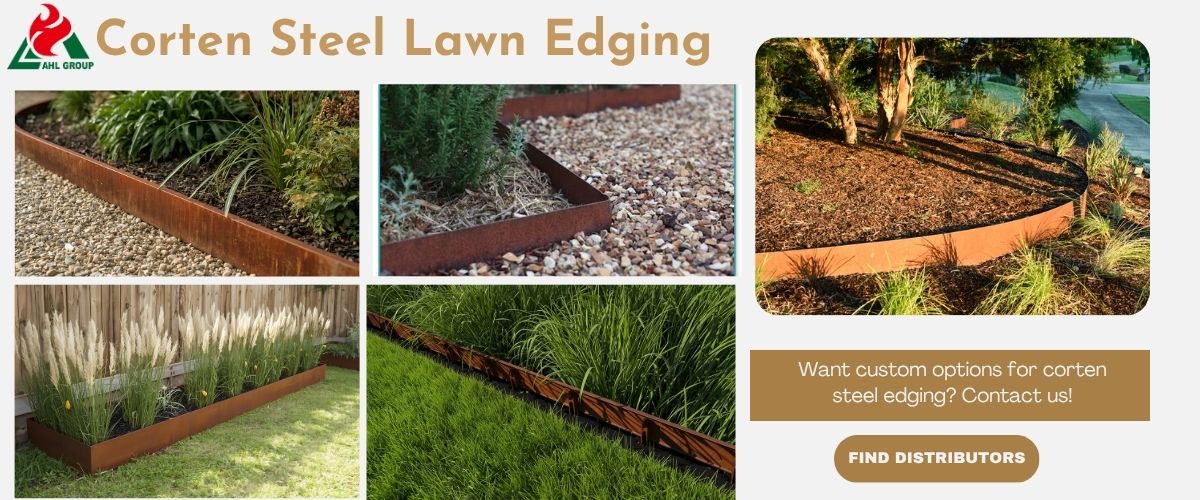
In modern landscape design, weathering steel edging has long been regarded as the benchmark for defining spatial quality, and is currently the most sought-after material for metal garden edging and perimeter borders.
With its naturally developing patina that deepens over time, it creates elegant lines between greenery, stone and paving, lending a sense of sophistication.
Compared to ordinary carbon steel, it offers significantly superior weather resistance and durability. When used outdoors, it can withstand decades of wind and rain, truly realising the concept of ‘landscape art that grows with time’, and is the material of choice for steel flowerbed edging and metal garden borders.
What appears to be a simple metal edging often becomes a challenge for many contractors and clients during actual installation:
Curved cuts that are uneven and jagged, ruining the aesthetic appeal of a smooth design; Insecure installation, leading to edging strips shifting or even lifting after soil freeze-thaw cycles and rainwater erosion; Rough cut edges posing safety hazards, and improper joint treatment resulting in water seepage and soil erosion. Details determine success or failure; even the finest materials will merely become cheap decorations without precise construction techniques. Drawing on professional landscaping experience, this article outlines a 10-step standardised cutting and installation process to address all pain points associated with corten steel edging installation, helping you create textbook-perfect garden borders.
Step 1: Planning and Positioning the Corten Steel Edging
The greatest pitfall in installing Corten steel edging is commencing work without a clear plan. Inadequate preliminary planning leads to extremely high rework costs later on; this step is the ‘foundation’ of the entire project.
Define the Application Scenario for CortenSteel Edging
Different scenarios require different specifications of corten steel edging, with entirely distinct functional and load-bearing requirements:
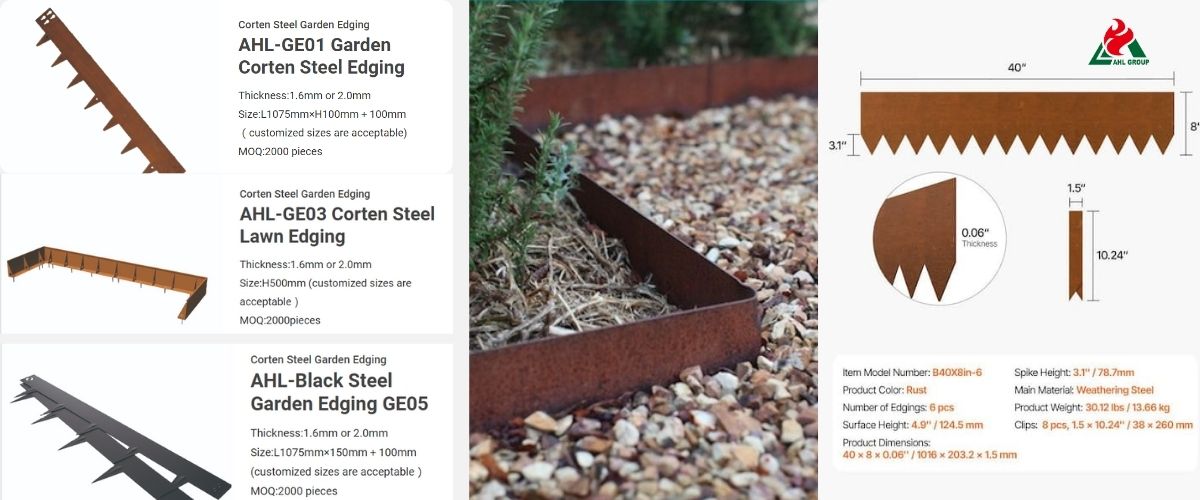
Lawn edging: Designed for a refined finish, with a thickness of 1.5–3 mm; its primary function is to prevent grass roots from spreading laterally;
Flower bed edging:Must withstand lateral soil pressure from within; a thickness of 4–6 mm is recommended, paired with a reinforced backing structure;
Driveway/footpath edging: Frequently subjected to vehicle and heavy loads; must interlock tightly with the paving layer to prevent edge collapse;
Terrace edging:Can serve as a small retaining wall; requires deep burial and reinforcement piles to ensure soil and water conservation.
Precise Measurement: Avoiding Relying On ‘Gut Feeling’ On Site
Before ordering materials, ensure key data is verified to avoid wastage or shortages:
Calculate the total length, allowing an additional 5–8% for overlap and cutting wastage; Confirm the number of corners and radius of curvature, and determine in advance whether to use right-angle welding or on-site cold bending; Verify elevation relationships, clarify the height difference between the top of the edging strip and stone or timber paving, and determine whether to use concealed metal landscape edging.
The Benefits of Professional Planning for Metal Edging
Thoroughly reviewing drawings and assessing on-site dimensions during the preliminary stages helps to pre-empt conflicts between underground utilities and fixed points.
Precise planning also maximises material utilisation, avoiding waste of expensive steel garden bed edging and ensuring subsequent installation proceeds as smoothly as putting together a jigsaw puzzle.
Step 2: Selecting the Specifications for Corten Steel Edging
Choosing the wrong specifications is the primary cause of subsequent deformation, rusting and perforation in weathering steel edging. Key purchasing principle: The greater the environmental stress, the higher the steel grade required, to meet the needs of steel garden edging in various settings.
Thickness Selection for Corten Steel Edging
3–5 mm (Lightweight Decorative Grade): Suitable for footpath borders and curved lawn edges; offers good flexibility, can be cold-bent on-site, and provides excellent value for money;
6–10 mm (medium-duty engineering grade): Suitable for small flower beds, driveway edges and slopes with a height difference of up to 15 cm; offers high impact resistance and is resistant to deformation under long-term pressure;
12–20 mm (heavy-duty structural grade): Suitable for large retaining walls, plinths in public areas and high-load-bearing zones; structural strength comparable to architectural steel beams; standard for high-end landscaping.
Height Options: Distinction Between Concealed Edging and Flower Bed Edging
Concealed/low-profile (100–150mm): Recommended to be buried two-thirds underground, with only 3–5cm exposed, clearly defining material boundaries without appearing obtrusive;
Elevated Flower Bed Style (300–900mm): Must be paired with reinforcement piles or backing panels; the greater the height, the higher the requirements for steel thickness and welding techniques, creating a three-dimensional landscape with depth.
Solutions for Special Climates
In coastal areas and regions with high rainfall and humidity, it is recommended to upgrade the selected thickness by one grade (e.g., changing from 3mm to 5mm).
This upgrade ensures the service life of themetal garden border edging reaches 30–50 years, withstanding the erosion of harsh environments.
Step 3: Gather Tools and Safety Equipment for Corten Steel Edging
Corten steel is highly hard and has a unique surface oxide layer, necessitating specific tools for installation. Ensure proper safety precautions are in place to balance efficiency with construction quality.
Core Installation Tool List
Cutting and Grinding Tools
Angle grinder: Fitted with a specialised metal cutting disc; ultra-thin discs are recommended for smaller, smoother cuts;
Flap disc: For grinding burrs and chamfering edges after cutting to prevent subsequent injury to pedestrians.
Measuring and Positioning Tools
Infrared spirit level: Ensures consistent horizontal alignment over long distances;
Stainless steel square: A high-precision square is essential for 45° butt joints at corners.
Shaping and Fixing Tools
Timber battens + sledgehammer: to assist in driving steel into the ground; the battens prevent the edge strips from deforming due to direct impact from the sledgehammer;
Bending clamps: for on-site bending of plates 6mm or thicker; must be used in conjunction with lever brackets for support.
Safety Guidelines
Fire and Contamination Prevention: Cutting generates high-temperature sparks; operation is strictly prohibited near dry grass or flammable vegetation. Lay protective mats on hard surfaces to prevent iron filings from forming stubborn rust stains when exposed to water;
Personal Protection: Wear cut-resistant, abrasion-resistant leather gloves and professional safety goggles to protect against high-speed flying metal shavings;
Secure Installation: Steel must be supported and secured on timber battens; cutting while suspended is prohibited to prevent the sheet from swaying or shifting.
Step 4: Marking Out and Pre-assembly to Eliminate Rework and Errors
Once corten steel edgings are fixed in place (particularly after welding or embedding in the ground), they are virtually impossible to adjust; pre-assembly is therefore a crucial step in ensuring a high-quality final result.
Scientific Marking Out to Ensure Smooth Lines
Establish reference lines: Start marking out from the building walls or the main axis of the paving to ensure the edging strips are parallel or perpendicular to the surrounding environment;
Control of straight sections:Drive fixing pegs every 3–5 metres and stretch high-tensile nylon string 10–15 cm above the ground to facilitate checking the alignment of the top edge of the edging strips;
Handling corners and curves:First, mark out all corners and T-joints; for curves, trace the line with a flexible tape measure and mark the path with chalk or spray paint.
Pre-Assembly Inspection: Identifying Issues In Advance
Before commencing excavation and fixing, arrange all cut panels in their correct positions in sequence:
Joint inspection: Keep the gap between panel joints within 2 mm to facilitate subsequent welding or bolting;
Curvature inspection: Observe from 5 metres away to ensure the curve has no abrupt corners; small-radius curves must be pre-bent;
Elevation alignment: Ensure the top edges of all panels are at the same design height to avoid unevenness.
Tips for Efficient Construction
During pre-assembly, mark the panels on the inside with a marker pen (e.g. A1, A2); this can increase efficiency by over 40% during the formal installation.
Step 5: Precision Cutting of Corten Steel Edging Strips
The quality of the cut directly affects the uniformity of the rust layer later on. Overheating during cutting or rough, jagged edges will not only cause slag build-up but also lead to uneven rusting and unsightly streaks.
Cutting Order: Large to Small, Whole to Scattered
Cut long straight sections first: cut to the marked dimensions, allowing a 5–10 mm adjustment margin;
Then tackle irregular sections: corners, T-joints and curved sections, making on-site fine adjustments based on the pre-assembly results.
Cutting Methods for Different Thicknesses
Thin sheets (1–3 mm): Cold cutting with alloy saw blades or plasma cutting is recommended to prevent discolouration due to overheating;
Thick sheets (>3 mm): Prioritise factory laser cutting; on-site work should use specialised carbon steel cutting discs; the use of old saw blades containing impurities is strictly prohibited.
Grinding of Cut Edges: Safe and Aesthetically Pleasing
Deburring: After cutting, thoroughly grind the cut edges with an angle grinder to remove welding slag and prevent the accumulation of oxidation layers later on;
Chamfering: Apply a slight 45° chamfer to the joints between panels; once rusted, the seams will form a natural, subtle line that does not look out of place;
Rounding: Round off the exposed top steel garden bed edgings of the panels to reduce the risk of knocks and scratches.
Step 6: Shaping Corners and Curves of Corten Edging
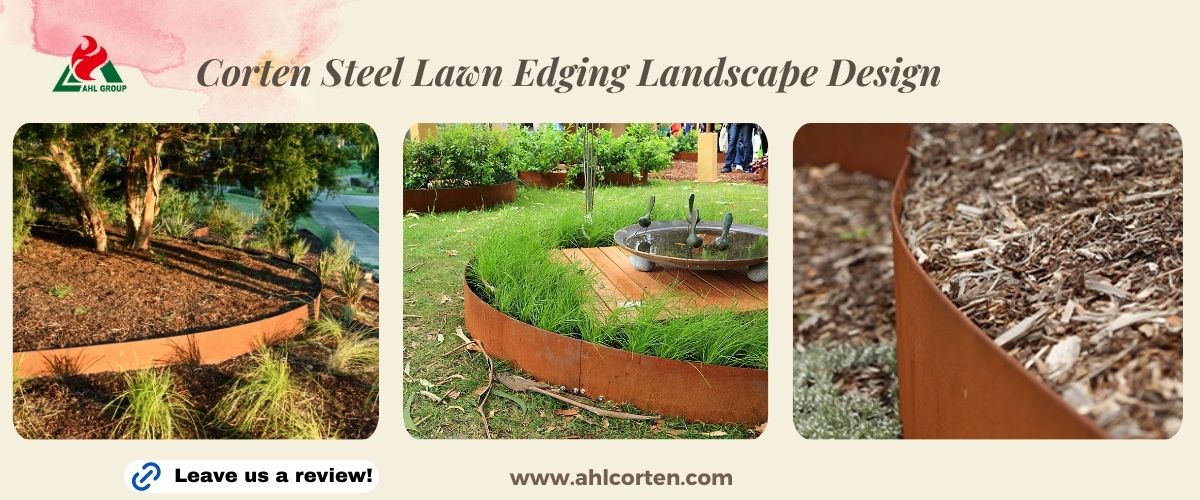
Straight lines convey order, whilst curves imbue the garden with soul. The rugged texture of corten steel contrasts with its warm, rusted hue after oxidation; by skilfully handling corners and curves, rusted steel edgings are elevated from mere building materials to landscape art.
Right-Angle Treatment: Two Professional Joining Methods
45° Mitre Joint: Both ends are cut at 45° and joined, creating clean, crisp lines suitable for minimalist designs. The inner side requires L-shaped fittings for reinforcement to prevent gaps caused by thermal expansion and contraction;
Overlapping Joints: One panel runs straight through whilst the other is fitted along the side. This method offers rapid installation and high tolerance for errors; the outer edges are rounded to simulate a seamless, monolithic effect.
Curved Edges: Selecting Techniques Based on Thickness
Thin panels (1.5–2 mm): Utilise the material’s elasticity by increasing the density of fixing pins (one every 30 cm) to force a natural, smooth curve;
Medium-thick panels (>3 mm): Cut shallow, evenly spaced grooves (without cutting through) on the back to increase flexibility, then bend manually; for small-radius circles and S-curves, factory roll-forming is recommended to avoid dents caused by on-site hammering.
Customised Fittings: Time-Saving and Precise
On-site cutting of corners is time-consuming, wasteful and prone to errors. Opting for one-piece, custom-moulded corner fittings can save 70% on on-site labour time. Factory-laser-cut fittings maintain dimensional accuracy within 0.5mm, with a uniform rust-colour transition, eliminating the scorched discolouration issues associated with manual cutting.
Step 7: Trench Excavation and Sub-base Preparation to Ensure Long-Term Stability
The rusted finish of corten steel is the ‘exterior’; the sub-base construction is the ‘framework’. If the sub-base is not properly compacted, the edge strips will become misaligned and localised settlement will occur after the first rainfall.
Trench Excavation: Depth Determines Stability
Lightweight Decorative Edging: Buried to 1/2–2/3 of the total height of the edge strip, suitable for flower bed edges and the boundary between lawns and gravel paths;
Heavy-duty Functional Edging: Embed 3/4 or even the entire length into the ground, leaving only 1–2 cm exposed; suitable for footpath edges, stone paving borders, and areas frequently contacted by lawnmowers.
Sub-Base Levelling and Drainage to Prevent Rusting and Loosening
Bottom Bedding: Lay 3–5 cm of graded crushed stone or fine sand at the bottom of the trench; this provides good drainage and facilitates minor height adjustments;
Levelling and Control: Use a long spirit level or laser level to ensure the surface is level; for long curved sections, allow a 1–2% drainage gradient to follow the natural terrain; localised depressions causing water accumulation are strictly prohibited;
Lateral compaction: Once the metal landscape borders are in place, backfill both sides with crushed stone or native soil, compacting repeatedly until the surface is firm enough that it does not wobble when stepped on.
Step 8: Fixing and Joint Treatment to Prevent Warping and Displacement
Corten steel edging strips expand and contract with temperature changes; if not fixed properly, this can lead to cracks in the joints and serpentine displacement, compromising the overall smoothness of the lines.
Diverse Fixing Methods for Corten Edging
Standard Fixing: For ordinary garden soil and sandy soil, use L-shaped or T-shaped corten steel ground anchors, 25–40 cm in length. Install one every 60–80 cm on straight sections, and reduce the spacing to 30–40 cm on curved sections;
Concrete bases: For silty or soft soils, retaining walls with significant height differences, and high-traffic footpaths, cast small concrete bases at the base of the fixing posts to completely prevent displacement;
Welded fixings: For edging strips 5mm or thicker, weld support ribs to the back and drive them directly into deep soil.
Precision Joint Treatment for Rusted Steel Edging
Seamless joints: use specialised backing plates, secured with bolts or self-tapping screws from the rear, ensuring no fasteners are visible from the front;
Overlapping joints: suitable for thin panels; ensure an overlap of at least 5 cm, maintaining a consistent direction;
Expansion joints: leave a 2–3 mm expansion gap every 3–6 metres to prevent panels from warping due to high summer temperatures;
Sealant application: Apply weather-resistant sealant to joints to prevent soil infiltration and weed growth, which would compromise aesthetics.
Step 9: Backfilling, Compaction and Final Tidying Up
Backfilling is not merely filling with soil, but a process of reshaping the edging strips, directly affecting the final smoothness of the lines.
Backfill Materials and Construction Techniques
Material Selection: Use fine soil or sand to backfill tightly against the edging boards. The use of large stones or construction waste is strictly prohibited to avoid localised bulging caused by uneven stress distribution;
Bilateral Backfilling: Backfill on both sides of the metal edging simultaneously to prevent the boards from tilting due to excessive pressure on one side;
Layered Compaction: After backfilling 10–15 cm, manually compact the material once to ensure the base is stable and free of voids.
Final Alignment and Cleaning
Alignment: Before compaction, re-check straightness and curvature using a spirit level and a taut string;
Surface Cleaning: Use a soft brush or high-pressure air gun to remove residual soil and cement slurry from the panel surface; alkaline cement residues can cause the rust patina to darken and result in permanent stains;
Final Inspection: Check that the height is uniform, the joints are seamless, and the lines are smooth; if these meet the design requirements, the work is complete.
Step 10: Routine Maintenance and Rust Colour Management
The appeal of Corten steel edging lies in its rust colour, which evolves over time. Scientific maintenance can shorten the rusting cycle and ensure an even rust colour.
Resolving Common Initial Issues
Rust Stains: During the initial installation period, the rust layer is unstable and may stain light-coloured paving when washed by rain. Temporary drainage channels may be laid beneath the edging for the first 2–3 months until the rust layer has stabilised;
Localised Colour Variation: Differences in sunlight exposure and drainage may cause uneven colouring in certain areas. This can be addressed by manually spraying the surface with water to simulate a wet-dry cycle, thereby accelerating the formation of a uniform surface oxide layer.
Key Points for Routine Maintenance
Regular Inspection: Check for water accumulation along the weathering steel edgings, as prolonged standing water can disrupt the oxidation cycle and shorten the service life;
Gentle Cleaning: For surface grease or dirt, wipe with a neutral detergent; the use of strong acids or alkalis is strictly prohibited.
Professional Rust-Finish Guarantee Service
For high-end residential properties, a professional, regular spray treatment service is available to accelerate and stabilise the rusting process. This ensures that corten steel edging develops a mature chocolate or deep chestnut rust patina within one year, with the subsequent oxidation remaining stable and requiring minimal maintenance.
Are You Ready to Choose Your Very Own Outdoor Corten Steel Edging?
By strictly following this 10-step standardised process, whether for metal garden edging, garden retaining edges or steel flowerbed borders, you can achieve smooth lines, a sturdy structure and an attractive finish. No more worries about installation errors or the hassle of maintenance; let steel landscape edging enhance your landscape with a premium finish that will last for decades. Contact us today to receive a free corten steel edging catalogue and quotation.

.jpg)
.jpg)